Palette Options with Existing Appointments
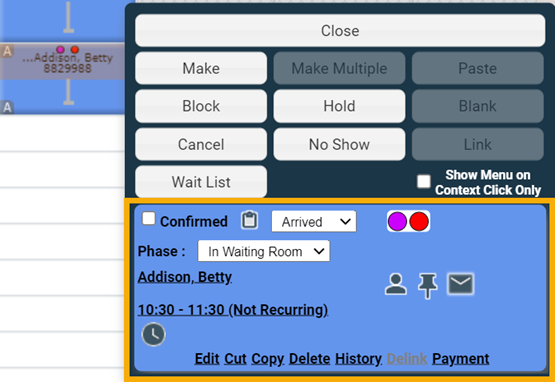
When you right-click an existing appointment on the grid, the Scheduling Palette displays the following additional options for the selected appointment.

Confirmed: Click the Confirmed checkbox to mark the appointment as confirmed. You can use the Check-in screen or one of the daily check-in reports to integrate the patient confirmation process into your daily workflow. The patient confirmation process is automated when all of the following conditions are met.
- Your organization has purchased the text messaging plug-in
- A SMS reminder has been created and configured to allow patients to confirm an appointment via reply to text message (Allow Confirmation Via Reply). See the Appointment Reminders help topic for more information.
- The patient is configured to receive SMS reminders at a valid mobile phone number. See the Configuring Patients to Receive Reminders help topic for more information.
- The patient confirmed the appointment via text within four hours of receiving the appointment reminder.
Status
Notes: Click the clipboard icon  to open the Appointment
Status Notes screen and enter a comment as follows.
- Type a comment into the New Entry text box.
- Click the Accept button to save the note and close the screen. (Click the Close button to close the screen without saving).
When a note has been entered, hover your cursor over the clipboard
icon to view the most recent note in a tool tip. Note that the clipboard icon displays as a page with text  instead of a blank page
  when a note has been entered.
Appointment
Status drop-down: To update the appointment status, click the drop-down  then select a status from the list. If you select either Arrived or Seen from the drop-down, the current
system time will be logged. If you select an incorrect status, click the drop-down again
and choose the correct status. The appointment status can also be updated on the Check-in screen. See the How to Change Appointment Status
help topic for more information.
Status Markers: Status Markers are organizationally defined flags that can be applied to an appointment. Markers provide a visual indicator that the patient requires some treatment, has a problem, or is at a particular stage in treatment. See the Markers help topic to learn how to apply or remove markers from an appointment. The Palette will not display any status marker icons if no markers have been applied to the appointment. If one or more status markers have been applied to the appointment, status markers icon(s) will appear on the Palette similar to the following example.

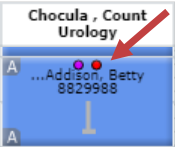
When status markers are applied to an appointment, they appear centered near the top of the appointment on the grid similar to the following example.

Phases: Phases are custom statuses that organizations can use to track where a patient is in their treatment workflow (for example, In Waiting Room). Select an item from the Phase drop-down list to assign a phase to the appointment. Note that the Phase drop-down will not appear on the Palette unless at least one phase has been configured in your system and you have the appropriate rights to manage phases on the grid. See the Managing Appointment Phases help topic for more information.

Patient Description: Click the Patient Description link to open the Demographics screen in a separate browser tab and view or edit the patient's demographic information. Click the grid tab at any time to return to the scheduling grid. If the Go to Grid on Save check box on the Demographics screen is activated, you will automatically be returned to the grid after clicking the Save button.

Appointment Time: Click the Appointment Time link to open the Rescheduling Appointment screen and reschedule the selected appointment. See the Rescheduling Patient Appointments help topic for more information. If an appointment is scheduled with multiple resources, (MR) displays next to the appointment time. See the Multisegment Appointments help topic for more information.

Treatment
Time: Click the clock icon  to display the Treatment Time text box and enter the actual treatment time in minutes. See the Treatment Time help topic for more information.
Select
Patient: Click
the patient icon  to select the patient and display the patient's demographic information in the grid's Patient Demographics panel. If you proceed to make an appointment, the patient will automatically be selected on the Edit Appointment screen. See the Patient Demographics Panel help topic for additional information.
Pin
Patient: Click
the pushpin icon  to pin the patient
to the grid. When you pin a patient to the grid, the patient is displayed in the leftmost grid column and highlighted in yellow. See the Pinning a Patient to the Grid help topic for additional information.
Print Appointment
Reminder Letter: Click the letter icon  to print a Reminder
Letter for the selected appointment (or appointment series).
You must have a One-Click Patient Reminder configured under the General Options of the User Preferences screen to print a reminder from the Scheduling Palette. If you consistently use the same letter, a One-Click Patient Reminder will save you time by bypassing the report parameters screen. See the User Preferences Overview help topic for more information.
No-Show Metrics: If a patient has one or more no-shows, a No-Show Metrics icon ![]() will appear along with the metrics including the number of no-shows, past appointments, and future appointments. The metrics are based on appointments associated with the patient’s current active account / episode of care. The no-show metrics include appointments with a status of No-Show and appointments that were canceled less than 24 hours before the appointment date/time. For example, Cancel/No-Show for 1 of 11 visits, 2 pending means that one of the 11 past appointments were no-shows and there are two future pending appointments.
will appear along with the metrics including the number of no-shows, past appointments, and future appointments. The metrics are based on appointments associated with the patient’s current active account / episode of care. The no-show metrics include appointments with a status of No-Show and appointments that were canceled less than 24 hours before the appointment date/time. For example, Cancel/No-Show for 1 of 11 visits, 2 pending means that one of the 11 past appointments were no-shows and there are two future pending appointments.
Edit: Click the Edit link to open the Edit Appointment screen and change the appointment details. See the Edit Appointment Screen help topic for more information.
Cut: Use the cut and paste process to move a single-resource appointment to a different time on the grid.
- Click the Cut link to place the appointment information on the clipboard. (Note the scissors icon appears near the bottom right of the appointment indicating that it has been placed on the clipboard.)
- Right-click the appropriate start time cell on the grid where you wish to move the appointment.
- Click the Paste button to complete the process. (An alternate method is to use the keyboard shortcuts Ctrl + x to cut and Ctrl + v to paste.)

Copy: Use the copy and paste process to duplicate an appointment on the grid. New appointments can be pasted into new times for the original resource or for a different resource.
- Click the Copy link to place the appointment information on the clipboard. (Note the copy icon appears near the bottom right of the appointment indicating that is has been copied to the clipboard.)
- Right-click the appropriate start time cell on the grid where you wish to create the new appointment.
- Click the Paste button. (An alternate method is to use the keyboard shortcut Ctrl + c to copy and Ctrl + v to paste.)

Repeat steps 2 and 3 as necessary to create multiple instances of the appointment.
Delete: Click the Delete link to delete an appointment scheduled in error that should not be included in statistical reporting. You will be prompted to confirm the delete. Click the Delete button to delete the appointment or the Cancel button to close the prompt without deleting.

History: Click the History link to display the Appointment History screen and view everything that has occurred to an appointment (for example, the date and time it was scheduled, the user who scheduled it, etc.). See the Appointment History help topic for more information.
Delink: Click the Delink link to open the Delink Appointment screen and split multisegment appointments. Depending on your organization's tracking preferences, you can create a single appointment for Resource A and Room B or create two separate appointments - one for Resource A and one for Room B. See the De-linking and Linking Multisegment Appointments help topic for more information.
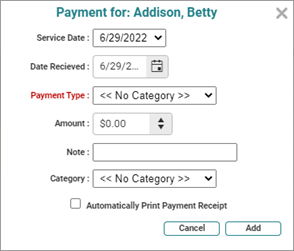
Payment: Click the payment link to open the Payment screen and apply a payment to the selected appointment. A payment can't be applied until the appointment is scheduled (i.e., a payment cannot be entered as part of the scheduling process). See the Patient Payments help topic for more information.

