Appointment Reminders
WellSky Resource Manager has numerous solutions for patient reminders that can be integrated into your daily workflow. The following discussion looks at two of these solutions: Text or SMS Reminders and E-mail Reminders. Both are supplemental modules that can be added to the main program. And both have a similar configuration.
To complete the configuration,
- Most likely will have either e-mail or text reminders, but you could have both, so make sure that you refer to the correct section.
- Your security profile must be configured with the right "Assign Text Message Reminders" set to Full .
Text Reminders
To begin:
- Select Data Maintenance > Communications > Appointment Reminders from the Main menu. The Edit Appointment Reminders screen will appear.
- Do Not Send Before/After Fields: Use the time parameters to configure when reminders should and should not be sent.
- Click one of the following:
- New E-mail
- New SMS button.
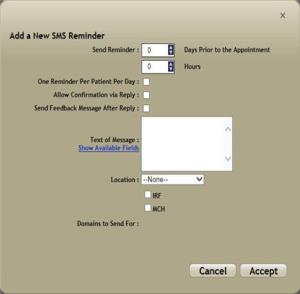
The Edit Appointment Reminder screen corresponding to you selection will appear. This example uses SMS or Text Reminders.
- Complete the parameters according to the following instruction:
- Days Prior to the Appointment
- Hours
- Click Accept to save the reminder event. Click Cancel to abort the process. The reminder will appear as a line item in the list similar to the following example. You can click the Arrow next to the message to view the reminder details. You also have the option to click the Edit link to the right of the message to edit it or click the Remove link to delete it.
- Click Save to commit the reminder event. Click Revert at any time during the edit process to clear the screen of unsaved data. Create as many events as your require.

The default values are 6:00 a.m. and 10:00 p.m. That is, no reminder will be sent to a patient before 6 a.m. or after 10 p.m. Either (a) click the hour or minute field for the parameter you want to change and enter the appropriate time or (b) use adjustment arrows to make changes (place cursor over field until the arrows appear).

The screen shot above illustrates the adjustment arrows that appear when a user hovers the mouse over the fields.

Send Reminder: Configure the point prior to the appointments that reminders should be sent to the patient:
Use the adjustment arrows or click a parameter and enter a value. Tab to or click the next parameter and repeat the process. Text messages will be sent throughout the day as appointments meet the parameters set for the reminder.
One Reminder Per Patient Per Day: Click this option to configure the system to send only one reminder for a patient per day, regardless of how many separate appointments a patient has on that day.
Allow Confirmation via Reply: Click this option to configure the system to allow the patient to confirm an appointment by replying to the text reminder. The text reminder will include the message Reply 'Yes' to confirm this appointment.
Send Feedback Message After Reply: Click this option to configure the system to send a reply when a patient successfully confirms an appointment via text. The reply message will read Your appointment is now confirmed.
Text of Message: Click the panel and type the message you want to send. A simple example includes the following:
This is a confirmation of your <<appt_date>> at <<appt_time>> with Dr. <<resource_last_name>>. Call (555) 555-5555 with any questions.
The program provides a set of merge variables (the text between the angle < > brackets) that pull demographic and appointment data directly from the patient and resource records as appropriate for each reminder. These can be viewed by clicking the Show Available Fields link. Copy and paste the variable text as needed, or type them as they are illustrated on the Merge Fields screen.
As of April 2018, the maximum message length has been reduced from 160 to 150 characters to account for variance in patient name length and to ensure that patients receive only one message per appointment reminder. If you try to save a message longer than 150 characters, a Message may be truncated warning displays at the bottom of the panel. The maximum number of characters allowed per message varies according to carrier. However, keep in mind that carriers reserve some space in each message for their own use. If you would like to create the message in another program and then just cut and paste it into the panel, you can do so.
Location: Select the location.
Domains to Send For: Select the domains to which the reminder applies.


Patient Text Reminder Configuration
Once you have configured the reminder messages that you want to use, you still need to configure your patients to receive the text (or e-mail) reminders in patient demographics. Do this as part of new patient registration or at any point after registration. As an example,
- Select Demographic > Patient Demographics from the Main menu.
- Select the appropriate patient to edit.
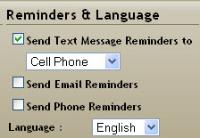
- While on the Demographics tab, navigate to the Reminders and Language panel.
- Click the checkbox next to "Send Text Message Reminders to" field , and then click the drop-down to choose the appropriate phone to use for the reminder.
- Repeat for every patient that should receive reminders.

Again, this information should be captured as matter of course in the general patient registration workflow, but it can be added/edited at any point.
If your organization uses the SMS reminders, the administrator may want to configure the phone designated for reminders as Suggested on the Required and Suggested Fields screen. In this way, the personnel who are registering patients will be reminded to attempt to obtain a usable phone number for the text reminder workflow.
E-mail Reminders
In general, the e-mail reminder setup is fundamentally the same as the text reminder setup. The following will point out the differences of which you need to be aware.
- Complete steps 1–2 as outlined above.
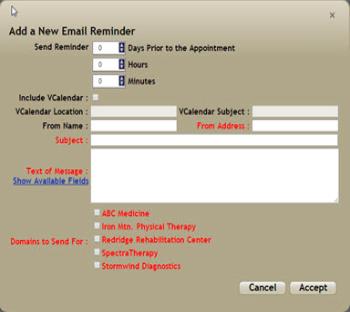
- Select New E-mail. The Edit E-mail Reminder screen will appear.

- Complete the details of the reminder according to the following descriptions/definitions:
- Days Prior to the Appointment
- Hours
- Minutes
- Click Accept to preserve the reminder event. It will appear in the list similar to the following example.
- Click Save to commit the reminder event. Repeat the steps as necessary to create additional reminder events. Click Revert at any time during the edit process to clear the screen of unsaved data.
Time To Send: Use the time parameters to configure when reminders should and should not be sent:
Use the adjustment arrows or click a parameter and enter a value. Tab to or click the next parameter and repeat the process. E-mails will be sent throughout the day as appointments meet the parameters set for the reminder.
vSubject and vLocation: Decide whether to include these headers with the e-mail—including these will ensure that an item is added to the patient’s calendar for their e-mail program (e.g., Outlook Calendar). Click the checkbox next to the Include vCalendar option, and then type the location (e.g., the clinic name, etc.) and subject.
From Name: Enter the appropriate sender: e.g., your clinic name.
From Address: Enter the appropriate sender’s e-mail address. This field is required.
Subject: Enter a subject line for the e-mail. This field is required.
Text of Message: Click the panel and type the message you want to send. An example may appear as follows:
This is a confirmation of your << appt_date>> at << appt_time>> with Dr. << resource_last_name>>. Call (555) 555-5555 with any questions.
The merge variables available for use can be viewed by clicking the Show Available Fields link. Merge variables pull patient, resource, and appointment data directly from the program as appropriate per patient. Copy and paste them as needed, or reproduce them as illustrated on the screen.
Domains: Select the appropriate domains for which the reminder applies. This field is required.
Patient E-mail Reminder Configuration
Just as with the text reminder component, patients must also be configured to receive e-mail reminders. Integrate this into your new patient registration workflow or at any point after registration.
To begin:
- Select Demographic > Patient Demographics from the Main menu.
- Select the appropriate patient to edit.
- While on the Demographics tab, navigate to the Reminders and Language panel.
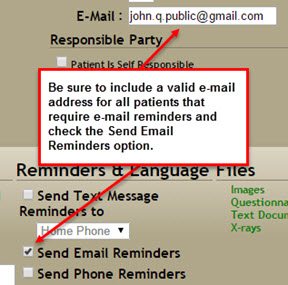
- Enter a valid E-mail address in the Personal Information panel.
- Enable the Send E-mail Reminders to field. This information should be captured as matter of course in the general patient registration workflow, but it can be added/edited at any point.

Administrators may want to configure the E-Mail address field as a Suggested field to ensure that the personnel responsible for registering the patients remember to attempt to obtain a valid address for the reminder workflow.
Reminders will be sent automatically to the patients with valid e-mail addresses according to the parameters set up with the reminder events.
