Patient Demographics Panel
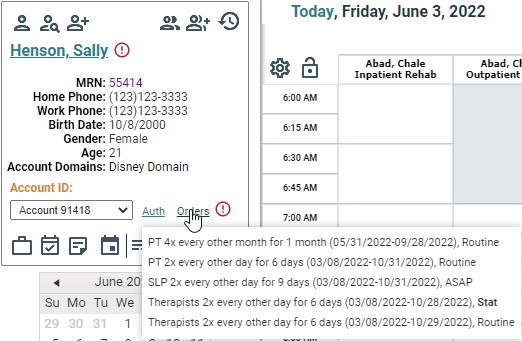
The Patient Demographics panel is where the information for the currently selected patient (or group) is displayed on the grid. This is the "active" patient, one who is ready to be scheduled. The information that is displayed in the panel comes from a standard set of demographic fields that are illustrated in the following screen shot.
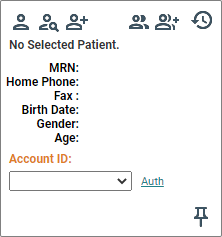
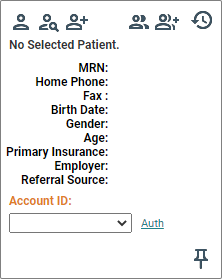
In addition to this standard set of data fields, users have the option to display up to 6 additional demographic fields that are also pulled from patient and account demographic fields. They include:
- Contact
- Resource
- Employer
- Referral Source
- Primary Insurance
- Patient Language
- Account
- Description
- Domains
- Admit Date
- Date Last Seen
- Date First Offered
- Re-evaluation Date
Refer to the Patient Panel Settings topic for instructions on configuring these for display. An example panel that is configured with the default case settings is illustrated in the following screen shot.
Panel Navigation Function
In addition to the basic information, the Demographics panel also serves as a waypoint for numerous scheduling and patient management features. Of these, only the selection tools are active until either a patient or group has been selected. To place a patient or group in context for scheduling or editing,
- Click either the Select
a Patient
 or the
Select a Group
 icon according to your current need. The corresponding search screen
will display.
 - Do either of the following:
- Locate the appropriate patient or group, click the description once, and then click the Select button.
- Locate the patient or group and then double-click the description.
The panel will refresh with your selection.
Additional Selection Features
![]() Advanced Patient Selection: Use this
feature for more refined patient searches— this is especially useful (a)
in organizations with large patient populations in which similar names
occur frequently or (b) for retrieving patients from archive.
Advanced Patient Selection: Use this
feature for more refined patient searches— this is especially useful (a)
in organizations with large patient populations in which similar names
occur frequently or (b) for retrieving patients from archive.
![]() Create
a New Patient: Use this option to register a new patient. The patient Demographics screen or the Quick Registration screen will
appear according to however you have configured your registration workflow
in the General Options of Preferences..
Create
a New Patient: Use this option to register a new patient. The patient Demographics screen or the Quick Registration screen will
appear according to however you have configured your registration workflow
in the General Options of Preferences..
![]() Create
a New Group: Click this button to create a new group. The New
Group screen will appear.
Create
a New Group: Click this button to create a new group. The New
Group screen will appear.
![]() Recent Patient/Groups:
This feature displays the last 10 patients or groups that you have added
or edited. Simply click the description of a patient or group to re-select
them.
Recent Patient/Groups:
This feature displays the last 10 patients or groups that you have added
or edited. Simply click the description of a patient or group to re-select
them.
As soon as you make a selection, some additional features are enabled (represented by a series of icons).
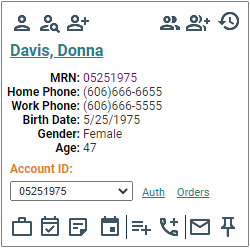
Use the definitions and descriptions provided in the following list to help navigate these.
Patient Information Features
Account ID: Verify that the selected account is correct. If not, click the drop-down and choose the correct alternative. By default, the WellSky Resource Manager will use the last account created, so if the patient has multiple active accounts, be sure to use the correct one. Organizations that do not use multiple accounts can ignore this feature.
If a case type has been assigned to the patient's case, it will display in parentheses along with the ID in the Default Case ID field.
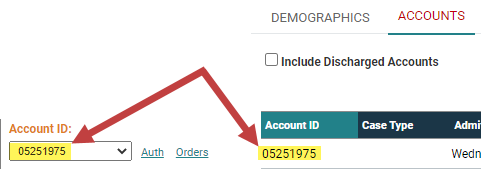
In addition to the Demographics panel, the account ID will also display in the Account ID field on the Accounts tab when editing a patient.
Auth link: Click this link to add, edit, or remove any authorizations assigned to the case.
Orders link: An Orders link will appear on the patient panel when an active patient account is selected and your Orders Handling security profile is set to Full or Read-only for the domain associated with the account.
Hover over the Orders link to view a summary list of the active orders for the account. If order priority is enabled for the domain associated with the account, the priority of the order will also display with the summary list of active orders. If a patient has orders with Stat or Urgent priorities, 'Stat' and 'Urgent' will be bold on the list and a red exclamation indicator will display next to the Orders link. The list is grouped by discipline and sorted by the earliest order end date.
Click the Orders link to open the patient orders screen with the selected patient in context.
![]() View Account: Click this option to navigate to the
Accounts tab in patient demographics.
From this screen you can edit/view existing accounts or create new ones.
View Account: Click this option to navigate to the
Accounts tab in patient demographics.
From this screen you can edit/view existing accounts or create new ones.
![]() View Appointments: Use this option to navigate to the Appointments
tab of patient demographics. This screen provides a complete listing of
the patients appointments and provides some management features for those.
View Appointments: Use this option to navigate to the Appointments
tab of patient demographics. This screen provides a complete listing of
the patients appointments and provides some management features for those.
![]() Display Note: Click to view the Patient
Notes, which are entered on the Demographics tab in patient demographics.
Display Note: Click to view the Patient
Notes, which are entered on the Demographics tab in patient demographics.
![]() Patient Cxl/No-Show: If the patient has one or more no-shows or cancellations, the Patient Cxl/No-Show indicator will appear. Hover your mouser pointer over the indicator to view the metrics. For example, Cancel/No-Show for 1 of 7 visits, 3 pending means that one of the seven past appointments were cancellations/no-shows and there are three future pending appointments. The metrics are based on appointments associated with the patient’s current active account / episode of care. The Cxl/No-Show metrics include appointments with a status of No-Show and appointments that were canceled less than 24 hours before the appointment date/time. If a Patient Cxl/No-Show Alert Threshold % was configured for the domain, and the number of cancellations and no-shows for the patient account has reached or exceeded the threshold, the indicator will appear in red. If the number of cancellations and no-shows is below the threshold, the indicator will appear in gray. If a threshold was not configured for the domain, the indicator will appear in red when the patient has one or more cancellations or no-shows.
Patient Cxl/No-Show: If the patient has one or more no-shows or cancellations, the Patient Cxl/No-Show indicator will appear. Hover your mouser pointer over the indicator to view the metrics. For example, Cancel/No-Show for 1 of 7 visits, 3 pending means that one of the seven past appointments were cancellations/no-shows and there are three future pending appointments. The metrics are based on appointments associated with the patient’s current active account / episode of care. The Cxl/No-Show metrics include appointments with a status of No-Show and appointments that were canceled less than 24 hours before the appointment date/time. If a Patient Cxl/No-Show Alert Threshold % was configured for the domain, and the number of cancellations and no-shows for the patient account has reached or exceeded the threshold, the indicator will appear in red. If the number of cancellations and no-shows is below the threshold, the indicator will appear in gray. If a threshold was not configured for the domain, the indicator will appear in red when the patient has one or more cancellations or no-shows.
Scheduling Functions
![]() Find Appointment for this Patient:
Click this option to launch Find Appointment for the currently selected
patient. Alternatively, select Scheduling
> Find Appointment from the Main menu. Find Appointment uses
patient, resource, date, time and day preference to locate and schedule
appointments.
Find Appointment for this Patient:
Click this option to launch Find Appointment for the currently selected
patient. Alternatively, select Scheduling
> Find Appointment from the Main menu. Find Appointment uses
patient, resource, date, time and day preference to locate and schedule
appointments.
![]() Add this Patient to the Wait
List: Click this option to add the current patient to the Wait
List.
Add this Patient to the Wait
List: Click this option to add the current patient to the Wait
List.
![]() Add this Patient to the Recall List:
Click this option to add the current patient to the Recall List.
Add this Patient to the Recall List:
Click this option to add the current patient to the Recall List.
![]() Print a Reminder Letter for this Patient:
Use this option to navigate to the Patient
Reminder Letter screen. The report parameters will populate with
the information for the currently selected patient. Select an alternate
patient if necessary, complete the additional report parameters as needed,
and then output the report to your desired destination.
Print a Reminder Letter for this Patient:
Use this option to navigate to the Patient
Reminder Letter screen. The report parameters will populate with
the information for the currently selected patient. Select an alternate
patient if necessary, complete the additional report parameters as needed,
and then output the report to your desired destination.
![]() Pin this Patient to the Grid: Click
this option to pin the current patient to the grid as the left-most scheduling
column.
Pin this Patient to the Grid: Click
this option to pin the current patient to the grid as the left-most scheduling
column.
Key considerations
- Groups display only the (a) View Appointments, (b) Find Appointment, and (c) Print Reminder icons. Their operation is exactly the same as with patients, but in a group context.
Inpatient Demographics Panel
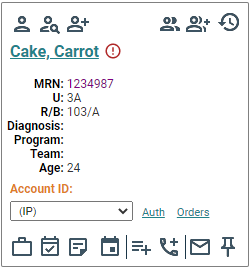
In addition to the default (outpatient) Demographics panel, WellSky Resource Managerprovides an Inpatient Demographics panel that looks similar to the following.
To configure your user account so that this panel is used in lieu of the standard (outpatient) panel,
- Click the Preferences link to navigate to User Preferences.
- Select Grid Preferences from the side menu.
- Locate the Patient Panel Settings pane
- Click the drop-down in the Use the Following Patient Panel option, and then choose Inpatient Panel.
- Click Save to commit your changes and then navigate to the grid.
