Edit Appointment Screen
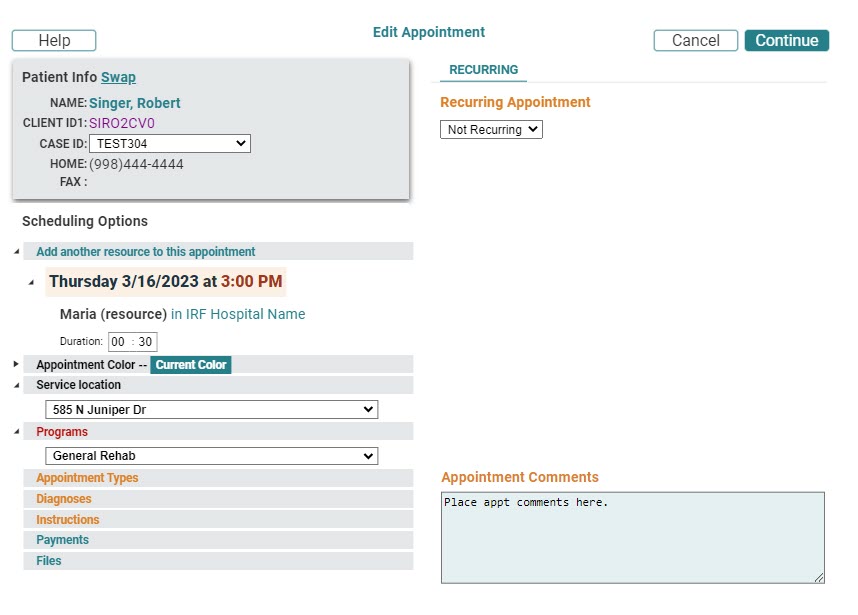
The Edit Appointment screen is the primary portal for managing the details of appointments. It is used to control not only the duration and complexion of the appointment but also the supplemental information such as the authorizations, procedures, diagnoses, instructions, files, and so forth that are associated with each appointment. This screen will appear automatically whenever an appointment is edited. Each organization also has the option to configure the system so that the Edit Appointment screen appears whenever a new appointment is scheduled.
Discussion of the Edit Appointment screen can be divided into the various functions that it provides:
- Patient Info
- Scheduling Options
- Recurring Appointments
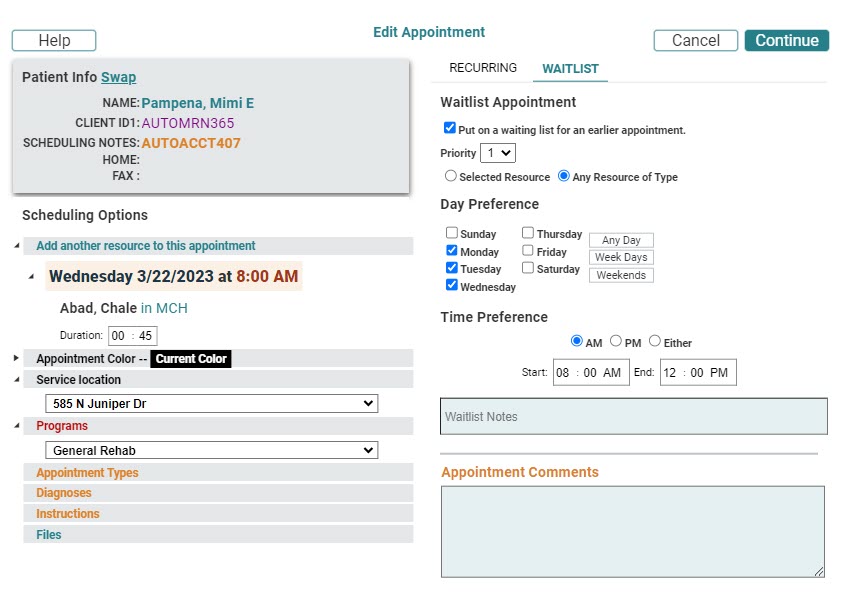
- Wait List
- Comments
To navigate to the screen:
- Make sure the scheduling grid is visible by selecting Scheduling > Grid from the Main menu.
- Do one of the following.
- Double-click an appointment, or else right-click over an appointment and select Edit from the Scheduling Palette to edit an existing appointment.
- Select a patient and then select time slots on the scheduling grid. Right-click over one of the selected time slots, and then select Make from the Scheduling Palette. (Note the Edit Appointment screen will appear on Make operations only if it is configured to do so.)
- Schedule an appointment for a patient from one of the find utilities offered in the scheduler.
- Use the following descriptions and links to navigate and complete the different functions on this screen.
- Once you have finished, click Continue to complete the appointment. The program will perform conflict checking and then post the appointment.
The Edit Appointment screen will appear.


Click the option to abort all the unsaved changes and remain in the Edit Appointment screen. A confirmation pop-up will appear.
Click OK to continue. The Edit Appointment screen will refresh and re-initializes the edit process. Click Cancel on the confirmation to retain your original changes and return to the screen.
Patient Information
Patient Information simply provides the basic demographic information and description of the patient for whom you are scheduling the appointment.
- Name: Verify that the selected patient is correct. If you have selected the wrong patient, you can click Swap to select an alternative.
- MR Number: This is just a display field for the patient's account number.
- Case ID: Verify that the correct case has been selected for scheduling.
- This is not a concern for organizations that do not use multiple cases
- In organizations that do use multiple cases, click the drop-down in the Case ID field to choose an alternative from the available options.
If a case type has been assigned to the patient, the description will appear along with the ID in the Case ID field.
If you have assigned an incorrect Case ID to an appointment, you may edit the appointment to swap the Case ID. See the Swap Case on an Appointment help topic for more information.

- Phone Numbers: These provide a simple contact reference to use in the event of a schedule change or if the patient fails to show for their appointment.
- Swap (Patient): Use swap to exchange patients for a given appointment or series.
- Patient Cxl/No-Show: If the patient has one or more no-shows or cancellations, the Patient Cxl/No-Show indicator
 will appear. Hover your mouser pointer over the indicator to view the metrics. For example, Cancel/No-Show for 1 of 7 visits, 3 pending means that one of the seven past appointments were cancellations/no-shows and there are three future pending appointments. The metrics are based on appointments associated with the patient’s current active account / episode of care. The Cxl/No-Show metrics include appointments with a status of No-Show and appointments that were canceled less than 24 hours before the appointment date/time. If a Patient Cxl/No-Show Alert Threshold % was configured for the domain, and the number of cancellations and no-shows for the patient account has reached or exceeded the threshold, the indicator will appear in red. If the number of cancellations and no-shows is below the threshold, the indicator will appear in gray. If a threshold was not configured for the domain, the indicator will appear in red when the patient has one or more cancellations or no-shows.
Comments
Comments field provides users the opportunity to add any general information appropriate to the patient’s individual appointment or appointment series. Simply click the field once to activate it and begin typing whatever text you wish to add.
Appointments, that have comments appear on the scheduling grid with a dog-ear in the upper right corner of the first cell of the appointment.

The convention serves as a visual indicator to the front desk and scheduling personnel, or whoever works with the patient, that notes have been added to the appointment and should be reviewed.
- Edit Comments by highlighting the text that should be changed and typing the new text. Alternatively, simply delete unwanted text.
- Add new text by placing the cursor at the insertion point (where you want the text to begin) and clicking the left mouse button. Then type your new text.
- View any comments simply by editing the appointment and reading the contents of the Comments panel.
Scheduling Options
Complete the features provided in the Scheduling Options panel according to the instructions found in the associated links.
- Scheduling Details
- Authorizations
- Referrals
- Procedures
- Order
- Diagnoses
- Instructions
- Patient Payments
- Files
Recurring Appointments
Please refer to the topic Recurring Appointments
Wait List
If the patient would like to be placed on the Wait List in case an earlier appointment becomes available, you can simultaneously schedule an appointment and add the patient to the Wait List. You cannot use the Wait List feature on the Edit Appointment screen for a group appointment or a recurring appointment.
When you add a patient to the Wait List from the Edit Appointment screen, the following Wait List values are automatically set based on the appointment information.
- Patient Name
- Resource
- Resource Type (Discipline)
- Domain
- Appointment Type
- Start Date - automatically set to the day after the current date
- End Date - automatically set to the day before the appointment date
Follow these steps to add a patient to the Wait List from the Edit Appointment screen.
- Make sure all the fields required to schedule an appointment are completed.
- Click the Wait List tab.
- Check the Put on Waiting List For an Earlier Appointment check box. Steps 4—9 are optional. If you skip to Step 10, default values will be assigned to the Wait List fields.
- (Optional) Select a value from the Priority drop-down list. The priority determines which patients on the Wait List get contacted for an appointment first. If you do not select a Priority, it defaults to None.
- (Optional) Activate either the Selected Resource radio button or the Any Resource of Type radio button. Choose the Selected Resource radio button to add the patient to the Wait List for an appointment with the same resource that the current appointment is being scheduled with. Choose the Any Resource of Type radio button to add the patient to the Wait List for an appointment with the same type of resource that the current appointment is being scheduled with. The Any Resource of Type radio button is selected by default.
- (Optional) Select a day preference by checking the box next to each day the patient is available for an appointment. You also have the option to click the Any Day button, Week Days button, or Weekends button to automatically check the boxes for the appropriate days. If you do not select any days, it defaults to No Preference.
- (Optional) Select an appointment time preference by activating the appropriate radio button for A.M., P.M., or Either. The Either radio button is selected by default.
- (Optional) Specify the preferred appointment time range by entering a Start Time and an End Time in the appropriate text boxes. The times are set to 12:00 A.M. by default.
- (Optional) Enter comments in the Notes text box as needed.
- Click the Continue button to schedule the appointment and add the patient to the Wait List.

Key Considerations
- If the Edit Appointment screen is not configured to appear on Make functions (i.e., the Use the Edit Appointment Screen when Making Appointments option is not enabled in system or domain settings), then case information such as authorizations and diagnoses are not assigned to the appointments automatically.
- If a user attempts to edit an appointment on a day that has been closed, the title bar on the Edit Appointment screen will list
Edit Appointment for [(patient) last name, first name] Read Only Day Is Closed.
Appointments that occur on closed days cannot be edited. See also, Closing a Day for related information.
