Multisegment Appointments
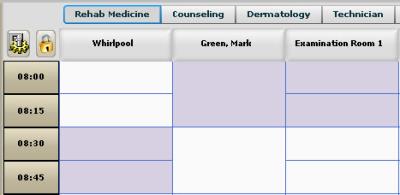
Multisegment appointments are used (a) to schedule multiple resources as a single appointment or (b) to schedule noncontiguous times as a single appointment for the same resource. These types of appointments can be scheduled on the grid or by using Find Appointment. To illustrate scheduling on the grid, we will schedule an appointment for Betty Addison in which she sees the PT Mark Green in Room 1 and then goes immediately to a whirlpool therapy. This single appointment requires three separate resources—some of which are scheduled at different times. In addition, the resources use different default time slot lengths.
To schedule this appointment:
- Select the patient to schedule.
- Select and place the resources to be scheduled in a scheduling column. See, Resource Scheduling Views for a review.
- Select the time for each resource, as illustrated in the following example.
- Do one of the following:
- Right-click over any part of the selection and then select Make on the Options menu.
- Click Make in the Scheduling Palette.
- Complete the appointment details as needed.
- Click Continue to complete the appointment.

The Edit Appointment screen will appear.
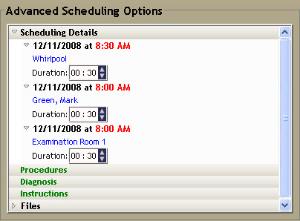
One difference you will notice between a single resource and a multiresource appointment is that the Scheduling Details section provides a separate detail line for each resource. To expand the details, click the right-facing arrow, as in the following example

The only item that can be edited is the duration of each resource segment. In fact, you may find it more efficient to select the starting time of each segment and then set the duration in the Edit Appointment screen. Use the Up and Down arrows of the spinner to increment or decrement the time, but you cannot set the duration to 0 (zero). If you no longer want to schedule a resource, click the red X next to the duration. A confirmation window appears asking to proceed with the action.
Multisegment Appointments and Make Multiple
Using Make Multiple, you can combine appointments (a) to create a multisegment appointment or (b) to save data entry time for appointments that require the same appointment details.
- Select the patient and the resources for the appointment. (See also, Scheduling Appointments Using Make Multiple.)
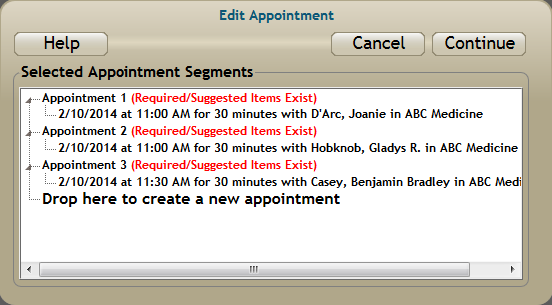
- Select the appointment times on the grid and then select Make Multiple from the Options menu.
- Click-and-hold the left mouse button down while the cursor is over Appointment 2.
- While holding the mouse button down, drag the details of Appointment 2 to the Appointment 1 line item.
- Release the mouse to complete the link.
- Click the appointment header (e.g., Appointment 1) to edit the details of the segment. The Edit Appointment screen will appear. Once the necessary changes are complete, click Done.
- Repeat step 6 for the subsequent appointments (2 … n) until you finished with all the appointments.
- Click Continue to finish.

The above example shows that three different resources need to be scheduled. Two, however, occur at the same time: Michelle Gonzales and Filbert Johansen both occur at 11:00 a.m. Depending on your business workflow and current needs, these two appointments can be combined into a single segment.

Once the details of the appointments are complete, you can leave the appointment as single multiresource appointment or separate the segments into individual appointments as described in the following section.
De-linking Segments on the Make Multiple Screen
De-link two or more appointments that are linked in the Make Multiple screen using the following instruction.
- Click-and-hold the mouse down over the details line item of the segment you want to separate.
- Drag the appointment line to the Drop here to create a new appointment option at the bottom of the screen and release the mouse. After a moment, a separate appointment will appear for the segment.
- Complete the details of all the appointments.
- Click Continue to complete the appointments.

The drag icon will change to a plus sign (+) when your cursor is in the appropriate drop spot (i.e., over the "Drag here" line).
See also, Multisegment Appointments Overview and De-linking and Linking Multisegment Appointments for additional information.
Key Considerations
- When you edit multisegment appointments, whatever details you add to the appointment apply to all of the segments. Only the duration of each resource segment can be edited separately. In general, however, changes made to the segments of the individual appointments in a recurring series are not applied to the rest of the series.
For example, if a segment is de-linked or if the duration is increased, the program does not apply the change to rest of the series. Likewise, if you add a segment to a recurring appointment, the program does not apply the resource change to the rest of the series.
Only when the changes are made to the specific details of the appointment—such as procedures, instructions, diagnoses, files, comments, and color—can they be applied to the rest of the appointment series.
- To move multisegment appointments on the grid, see How to Cut and Past Appointments and How to Drag and Drop Appointments. See Rescheduling Patient Appointments for an alternative method of moving the appointments.
- Procedures are not tied to the Duration in multisegment appointments as they are for single resource appointments. That is, as procedures are added to a multisegment appointment, the appointment duration does not increase with the procedure duration. You must manually adjust the duration of each segment.
- If you work in the weekly or monthly view, keep in mind that if you select time slots over several days and then schedule an appointment, you will be creating a multisegment appointment that spans days.
For example, select the 8:30 a.m. time slot for an entire week and schedule an appointment. If the patient checked in on Tuesday and was marked as being seen, all the other segments would be checked in and marked as seen.
Be sure that if you schedule in the weekly or monthly modes and you want separate appointments that you either (a) schedule one appointment and copy it to the other times to which it applies, (b) use the recurring option, or (c) schedule the appointments separately.
- Use Make Multiple to schedule distinct appointments such as for a practitioner, an examination room, and a whirlpool.
