De-linking and Linking Multisegment Appointments
When working with multisegment appointments, inevitably situations will arise when it becomes necessary to separate the segments into individual appointments or cancel just part of the appointment. This can be accomplished with the De-link and Link functions.
De-linking Appointment Segments
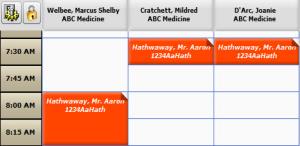
The following screen shot illustrates a single multisegment appointment that has been scheduled with the three resources.

Using the example illustrated above,
- Locate the segment to de-link
- Do one of the following:
- Right-click over any part of the appointment and the select Delink from the options menu.
- Click any part of the appointment and then click Delink on the scheduling palette.
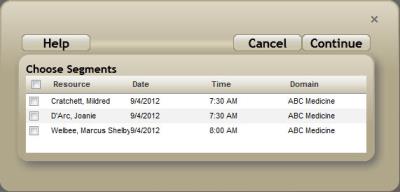
- Either
- Click the checkbox in the column header row (next to Resource) to select all of the segments
- Click the checkbox next to one or more specific segments to de-link.
- Click Continue.
The Delink Appointment for … screen will appear.

The scheduling grid will refresh. Edit a segment to verify that the appointment was de-linked or view segments on the Check-in screen or on the patient's Appointments tab.
Cancel or edit any single resource as you would normally. Any appointments that are still composed of two or more segments still adhere to the multiresource workflows.
Linking or Re-linking Separate Appointments
If necessary, you can link two or more appointments that were made separately into one multisegment appointment or re-link an appointment segment to the main appointment after you have edited it. Keep in mind that when you re-link appointments that any edits that you performed on the de-linked appointment will be appended to the re-formed multisegment appointment (e.g., appointment comments, etc.).
- Use Ctrl + Click to select the appointments to link (note, select any segment of the original multisegment appointment and the de-linked one).
- Do one of the following:
- Right-click over any of the selected items and then select Link from the Options menu.
- Click Link in the scheduling palette.
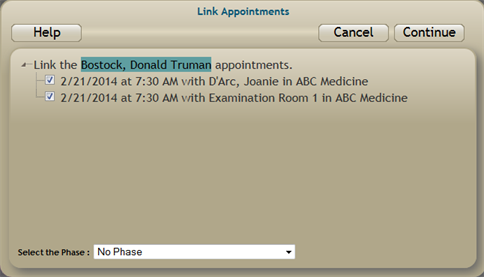
- Verify that you have selected the correct appointments and that the checkbox options next to each is checked.
- If you organization uses phases and it is appropriate, click the drop-down in the Select the Phase field and choose an appropriate option.
- Click Continue to complete the re-linking process.
The Link Appointments screen will appear.

A dialog will appear will the program processes the request and then you will be returned to the grid. You can verify the link took by viewing the appointment details (double-click any segment).
Linking Appointments Series
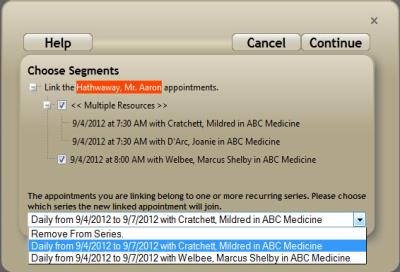
When one or more of the appointments that you are linking is part of a series, users must consider which series to apply the newly formed appointment. Continuing with the appointment example above, assume that the Marcus Welbee segment was de-linked from the original appointment and we want to re-link it.
- Complete steps 1–3 above.
- Click the drop-down to view your options.
- Click Continue to complete the link.

As you can see from the example above, we are re-linking the Welbee appointment with the original segments for Cratchett and D'Arc. You can also see that the following option appears:
The appointments you are linking belong to one or more recurring series. Please choose which series the newly linked appointment will join.
Keep in mind that you are simply selecting the series to which the appointment should belong. You cannot apply resource segment changes to an entire series from the grid.

In this example, you have the option to remove the newly linked multisegment appoint from the series or apply it to the existing daily series starting on 9/4/2012. When both appointments being linked are part of a series, you can choose which series to apply the new appointment.
Key Considerations
- See How to Cut and Paste Appointments or How to Drag and Drop Appointments for instruction about moving all or part of a multisegment appointment on the grid. See Rescheduling Patient Appointments for instruction about moving them using the Find Appointment utility.
- Keep in mind that when you link or de-link appointments on the grid using either the scheduling palette or the options menu, the change will affect only the appointments for the day in which you working. If you want to affect an entire series, you must make your changes from the Edit Appointment screen.
- When a segment is de-linked, it becomes its own appointment, having its own history. The first Action entry in the Appointment History screen for the new appointment is an entry for “De-linked,” not “Make.” The history for the original appointment will show one action item for “Make” and for “De-linked”.
- The History for appointments that are linked show a “Make” for the first segment found in the database and a “Link” entry for the linking of the segments. If any of the segments other than the first had been moved, canceled and marked pending again, the history of that action will be lost.
Multisegment appointments show "<Multiple Resources>" in the Resource Name column. Hover over the entry to view all of the resources involved.

Run the Changes to Schedule report for each resource involved in a multisegment appointment to provide a picture of what has happened to each segment of the appointment.
