Swap Patients on an Appointment
Use the swap feature to exchange the patient currently associated with an appointment for an alternate patient. This feature solves the need of some facilities to maintain a recurring appointment series regardless of the patient with whom it is associated (e.g., IRF installations). The appointment essentially serves as placeholder in the resource schedule, preventing unintended modification while it is in transition between one patient and another. The feature is not, however, limited to series; rather, it can be used with any appointment—consider a mistakenly scheduled patient, for example.
Swapping Single Appointments
To begin:
- Navigate to the appropriate date and make sure that the desired resource is placed in a scheduling column.
- Edit the appointment that requires the swap: for example,
- Double-click the appointment
- Right-click over the desired appointment and select Edit from the Options menu.
- Click the appointment once and then click Edit in the appointment details panel.
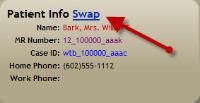
- The Swap option appears as a link in the Patient Info panel to the right of the panel heading:

Click the link once to initiate the exchange. The Patient Search screen will appear.
- Locate and select the desired alternate patient for the appointment.
- A pop-up confirmation will appear if the "source" appointment contains any of the following:
- Authorizations
- Referrals
- Payments (note that payments are marked as deleted on the source appointment once the swap is complete). Note that if the user does not have the appropriate rights to delete payments in their security profile definition, the Swap will not appear on the Edit Appointment screen.
- Files
- Verify that the new patient's case is the correct one for the appointment. If not, click the drop-down in the Case ID field to choose an alternate.
- Edit the details of the appointment as required, (a) modifying color, diagnoses, procedures, and so forth, (b) adding authorizations or referrals, or (c) amending comments.
- Click Continue to complete the swap. Alternatively, click Revert to abort all unsaved changes and start over, or click Cancel to abort editing the appointment altogether.

These items are not retained in the new patient appointment.
Click OK to continue. Click Cancel to abort the swap. The Edit Appointments screen will refresh with the new patient's information when you click OK.
Swapping Patients on Recurring Series
- Complete steps 1–7 above.
- Do either of the following:
- Leave the Recurring option set to No Action and click Continue to complete the swap. The appointment on which you clicked will be swapped with the selected patient—no other appointments in the series will be affected.
- Click the drop-down in the Recurring option and select Apply All Changes to Series. The Start and End dates will become activated, starting with the date of the appointment on which you clicked and ending with the series End Date. Complete step 3 prior to clicking Continue.
- Modify the Start and End Dates according to your current needs. If you leave the dates alone, all of the remaining appointments will be swapped. Modify the Start and End Dates to swap out only a portion of the remaining appointments in the series.
- Click Continue to complete the swap.
Key Considerations
- The swap patient feature is governed by both the "Add Appointment" and the "Delete Appointment" operations in the user's security profile. If the appointment has payments, the user must also have "Delete Payment" set to Full in their profile. The Swap link only displays on the Edit Appointment screen for users with appropriate security profile permissions.
- You cannot swap patients on past appointments.
- The appointments for which you are trying to swap patients must have a status of Pending. That is, you cannot swap patients for appointments that have been marked Arrived or Seen. If an appointment was incorrectly checked in, then set the status back to Pending and then proceed with the swap.
- If your organization relies on recurring appointments to maintain a resource's workflow, you may want to consider configuring the following as appointment display fields:
- Groups cannot be swapped. This is a patient feature.
Recurring Appointment: Pattern Type: This will display Daily, Weekly, Bi-weekly, or Monthly according to the pattern selected for the series.
Recurring Appointment: Range: This will display the date range encompassed by the series.
Recurring Appointment: Visits: This will display the number of visits in the series.
An example of how these display fields appear in an appointment is shown in the last three lines of the following screen shot.

