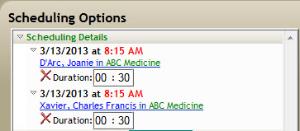
Scheduling Details
The first line item in the Scheduling Options provides the Scheduling Details. This section lists the basic "demographics" for the appointment, including:
- The date and time of the appointment or its segments
- The resource(s) for whom the patient is being scheduled
- The duration of the appointment or its segments.
When an appointment is displayed in the Edit Appointment screen, the details line should be expand to show the outlined details (as illustrated below).

When two or more resources are scheduled at the same time (e.g., a therapist and a room), however, only the date and time of the appointment are exposed.

Simply, click the right facing arrow next to a segment to expand the details.
Managing Resources from the Edit Appointment Screen
The Scheduling Details panel not only displays appointment demographics but also allows users to reassign an appointment to another resource or add a resource segment to the appointment. See also, Multisegment Appointment Overview for a discussion about multisegment appointments.
Adding a Resource Segment
- While creating a new appointment or editing an existing one, place the cursor over the Scheduling Details heading and click once.
- Locate and select the resource whom you wish to add to the appointment. The Edit Appointment screen will refresh with the new resource segment.
- Click the right-facing arrow to toggle the details of the appointment from expanded to collapsed.
- Click Continue to commit your changes. The program will perform a normal conflict check and then post the new multisegment appointment.

The Resource Search screen will appear.


"Moving" an Appointment from one Resource to Another
If for some reason the patient was scheduled with the wrong resource or if a resource cannot make an appointment, you can reassign it to a new resource from the Edit Appointment screen.
- Locate and edit the appointment that requires a new resource.
- Click the resource link once: e.g., Xavier, Charles Francis in this example. The Resource Search screen will appear.
- Locate and select a new resource for this appointment segment. The Edit Appointment screen will refresh to display your selection.
- Click Continue to commit your changes.

If necessary, expand the appointment details so that you see the resource information.
Key Considerations
- The following must be true in order for user to add a resource segment (or move an appointment) on the Edit Appointment screen.
- You can only change the scheduled resource. You cannot change the Start Time of the appointment from this screen.
Allow Resource Addition to Existing Appointments: This option must be enabled for the organization or the domain.
Add/Remove Resources from Existing Appointments: Users must have this option set to Full in the security profile for the organization/domain before they can use the features. If a user has the right set to Full, but a domain has not enabled the option, resources from that domain will not be available from the Edit Appointment screen.
Duration
Adjust the duration on an appointment as needed. Consider an appointment that has been scheduled for 15 minutes but which actually requires 30 minutes to complete as an example,
- Locate and edit the appointment that requires a new resource.
- Click the right-facing arrow next to the date to expand the appointment details (if it is not expanded currently). Choose an individual segment in the same manner.
- Place your mouse over the Minutes or Hours to expose the adjustment arrows.
- Click the Up arrow to increase the appointment length to 30 minutes.
- The duration spinner will increment/decrement the appointment time based on the default time slot length of the resource with whom the appointment is scheduled.
- As alternative, schedule an appointment simply by clicking the cell corresponding to the start time of an appointment, and then set the appointment length in the Edit Appointment screen using the Duration spinner. These are just a few examples of how you can use Duration to control your appointment lengths.

Duration and Resource Time Slot Lengths
Another important consideration regarding duration concerns moving an appointment between resources who schedule in different time increments. For example, when a 15-minute appointment is moved from Resource A to Resource B (who schedules in 30-minute increments), a conflict list will appear stating you are not using the entire cell for the resource’s time. If the appointment is scheduled, a jagged edge will appear at the bottom of the time slot for the new resource, indicating that the appointment ends prior to the end of the time slot. Of course the duration may always be edited manually.

Other Changes to Duration
- In the event that procedures are assigned to the appointment that have a defined duration greater than the time scheduled for the appointment, the program will generate a warning similar to the following:
- The duration cannot be set to 0 (zero). The lowest value duration can have is the default time slot length for the resource being scheduled.
- WellSky Resource Manager only adds time based on the duration of procedures selected for an appointment. It will not decrease time when procedures are removed.

Click OK to extend the duration, Cancel to retain the duration.
