Swap Case on an Appointment
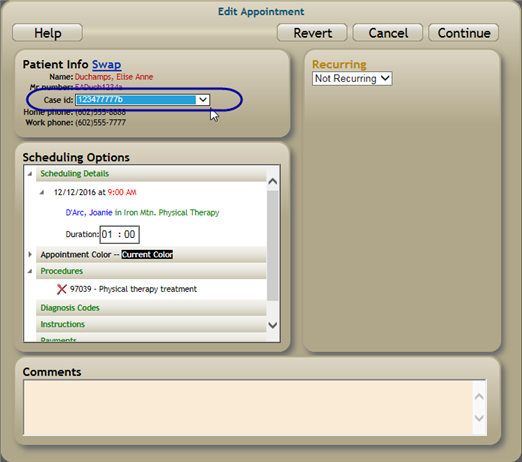
Use the Case ID drop-down located in the Patient Info panel of the Edit Appointment screen to swap the case associated with an appointment. This feature eliminates the need to delete and recreate an appointment if it has been associated with an incorrect case. This feature can be used to swap the case on a single appointment or on a recurring series of appointments.
Swapping the Case on a Single Appointment
Follow the steps below to swap the case on a single appointment.
- Navigate to the appropriate date on the scheduling grid and make sure that the desired resource is placed in a scheduling column.
- Right-click on the appointment to open the Scheduling Palette.
- Click the Edit link to open the Edit Appointment screen.
- Select the correct case from the Case ID drop-down located in the Patient Info panel near the top left.
- Edit any other details of the appointment as needed (modifying color, diagnoses, procedures; adding authorizations or referrals; or amending comments).
- Click the Continue button to complete the edit. (Alternatively, click the Revert button to abort all unsaved changes and start over, or click the Cancel button to abort editing the appointment altogether.)

Swapping the Case on a Recurring Series of Appointments
Follow the steps below to swap a case on a recurring series of appointments.
- Navigate to the appropriate date on the scheduling grid and make sure that the desired resource is placed in a scheduling column.
- Right-click on the appointment to open the Scheduling Palette.
- Click the Edit link to open the Edit Appointment screen.
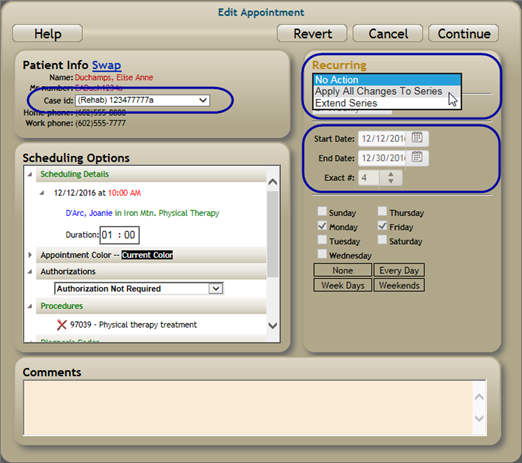
- Select the correct case from the Case ID drop-down located in the Patient Info panel near the top left.
- Choose one of the following options from the Recurring drop-down.
- Leave the Recurring option set to No Action. The case for the currently selected appointment will be swapped. No other appointments in the series will be effected.
- Select Apply All Changes to Series. The Start Date and End Date fields will become activated, starting with the date of the appointment you are currently editing and ending with the series End Date. Leave the dates as is to swap the case for all remaining appointments in the series, or modify the Start Date and End Date to swap the case for only the remaining appointments in the series that fall within the specified date range.
- Click the Continue button to complete the edit. (Alternatively, click the Revert button to abort all unsaved changes and start over, or click the Cancel button to abort editing the appointment series altogether.)

Key Considerations
- The Swap link only displays on the Edit Appointment screen for users with appropriate security profile permissions.
- You cannot swap cases on past appointments.
- Group appointments cannot be swapped. This is a patient feature.
