Case Types
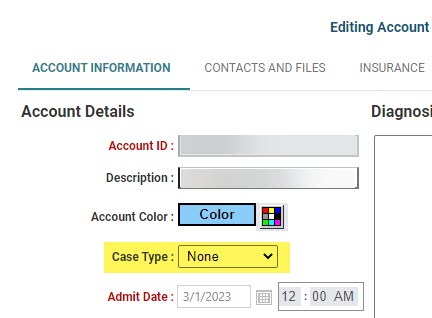
Primarily used within the inpatient workflow, case types are used to establish default values for appointment parameters as patients are scheduled or the patient's schedule is viewed. For example, one case type parameter is used in combination with compliance to override the default minimum treatment required for inpatient rehabilitation. Another simply establishes an average length of a course of treatment when recurring appointments are scheduled. Once administrators decide upon the types that are required for the organization, users simply apply the type to the appropriate patients in case demographics.
To begin creating case types:
- Select Data Maintenance > Case Types from the Main menu.
- Description: Enter a description for the current case type, up to 128 characters. Be sure to be as descriptive and meaningful as possible in that types are available to all users of the program (e.g., they are not restricted to domains). This field is required.
- Complete the case type parameters required for the current definition according to the descriptions and definitions provided in the following sections.
- Once you have finished, click Save to commit the new case type.
- Repeat steps 2–4 as necessary to create as many case types as required.

Minimum Required Patient Scheduling Minutes per Day
The standard metric used for schedule compliance in rehabilitation therapy is based on the 3-hour rule established by CMS/Medicare. Some circumstances, however, may require a different threshold, which can be accomplished using one of the following two methods:
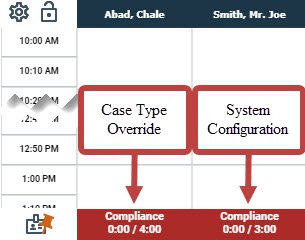
Minimum Required Patient Scheduling Time per Day: The system default for compliance is configured in Data Maintenance > System and Security > System Settings. All new databases are configured to 180 minutes (3 hours). If appropriate, administrators can change this value, but keep in mind that it will affect all users of the system.
Case Type: To apply a compliance threshold without changing the system default, users can assign a case type to the appropriate patient’s case.
- Complete steps 1–2 outlined in the first section.
- Enter the desired override time in minutes in the Minimum Required Patient Scheduling Minutes per Day field.
- Complete the other parameters on the Account Types screen as necessary.
- Click Save to commit your changes.
As an example, consider the following screen shot in which a case type requiring 4 hours minimum per day was applied to the first, pinned column versus the default minimum (3 hours), which is illustrated by the patient column for Mr. Joe Smith.
Default Recurring Appointment Pattern
The recurring appointment pattern establishes default parameters so that users can simply select the case type on the Edit Appointment screen to automatically configure the recurring pattern required. Use this feature in combination with requirements so that users who schedule patients of given type will not only be reminded/required to schedule a recurring appointment but will also schedule it for the appropriate amount of time.
To begin:
- The default recurring pattern type: Click the drop-down and choose a recurring pattern from the following options:
- Daily
- Weekly
- Bi-weekly
- Monthly
- Enter the default length of stay (in days, weeks, or months): This option has two parts. (a) Click the drop-down to choose how you want to measure the time frame for the series (the default is in Days):
- Days
- Weeks
- Months
- Complete the Daily/Weekly/Monthly options. For example in Daily mode you can choose between Every Work Day and Every Day. The default is Every Work Day (in inpatient scenarios, every work day is equivalent to a 7-day work week). Weekly and Monthly scenarios each have their own set of options that are self-explanatory.
- Click Save to commit your changes once you have completed the case type.
This option defaults to Not Recurring. As you make your selection, additional options will appear.
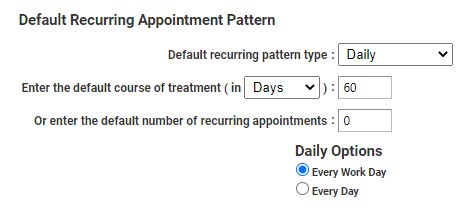
Once the unit of measure has been selected, then enter the length of the course of treatment. As an example, consider the hypothetical workflow for a type of neurology patients who on average require daily treatment over a 60-day stay. Each of the following illustrates a valid method for creating this series.
- Set the measure
to Days and enter 60 in
the field.
- or set the measure to Weeks
and enter 8 in the field.

- o set the measure to Months and enter 2 in the field.

Use whatever you require to achieve the appropriate (most accurate) course of treatment length. Then as you schedule the patients of a given case type for recurring appointments, the program will automatically set the date range based on your configuration.
Procedure Categories: Hours by Discipline Configuration
WellSky Resource Manager uses procedure categories in case types to define up to three disciplines of treatment, and then displays the hours scheduled for each of these disciplines as a patient column statistic. To determine the hours scheduled, WellSky Resource Manager sums the time for each appointment that is scheduled with a procedure belonging to one of the disciplines. See Scheduled Hours by Discipline for further illustration.
- Complete steps 1–2 from the start of the topic. Procedure categories that can be used as a discipline appear in the Available panel.
- Double-click the description a category to assign it. Successfully assigned categories appear in the Assigned panel.
- Repeat as necessary up to three times.
Remove an assigned category by double-clicking the description in the Assigned panel.
Case types can have no more than three procedure category assignments.

Example illustrate a generic "Rehab" case type with OT, PT, and SLP disciplines.
Workflow for Configuring the Discipline Statistic
- Create the procedure categories that are representative of the disciplines you require: Examples include OT, PT, and SLP.
- Create and/or assign the appropriate procedures to the procedure categories (disciplines).
- Make sure that the Show Discipline Statistics is turned on in Preferences.
- Create the case types you require, and assign them to the appropriate patients.
- Schedule the patients and assign procedures that fit within the discipline categories.
- Click the bottom of the patient column to toggle the discipline statistic into view. (Compliance statistics are displayed by default if both statistics are used. If, however, compliance is turned off and discipline is turned on, then the discipline statistics will show by default.)
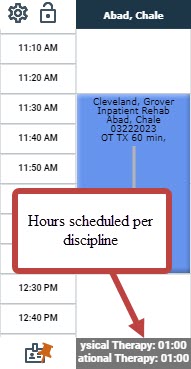
Using the illustration, we can ascertain that John Baker was scheduled for 30 minutes and 45 minutes respectively in the PT and OT disciplines.
Key Considerations for Hours by Discipline Display
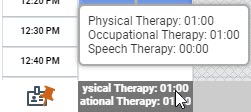
- Case types allow up to three categories. The statistics for the first two categories are displayed at the base of the patient column. Mouseover the statistics to pop a tooltip and display the statistic for the third discipline.
- If two (or more) procedures from different disciplines are scheduled concurrently, the amount of time scheduled will appear in each discipline line item.
- If you make changes and the change is not immediately reflected in the statistics, simply refresh the page.
- If the compliance statistic is turned on, it will appear first. Click the patient column base to toggle the scheduled hours by discipline into view. However, if compliance is turned off, then the hours by discipline will always show. Hours by discipline replaces the 5/7 day compliance statistic that previously would show when users toggled daily compliance.
Applying a Case Type to a Patient
Once a case types exists, it is a simple matter to add it to a patient record (a) through the new patient registration workflow or (b) by editing an existing patient's case. The following illustrates editing a case—both workflows take users through Case Information.
- Select the patient as you would normally.
- Navigate to the Cases tab in patient demographics, and then select the case to edit. The Case Information screen will appear.
- Click the drop-down in the Case Type field and select the desired case type definition.
- Complete your case demographic entry and click Save to save the case, and then click Save on the patient demographic screens to commit the changes to the patient record.
