Scheduling Options Menu
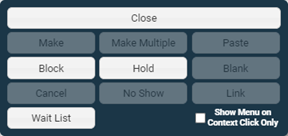
Right-click an appointment or time on the grid to open the Scheduling Palette and display the available appointment options and information. The available Palette options depend on the selected appointment or resource time. When a Palette option can be completed, it is enabled. When a Palette option cannot be completed, it is disabled.

Scheduling Palette Options
The following options are available through the Palette.
Close — Click to Close button to close the Palette.
Make —Select an appointment or time on the grid then right-click to display the Palette. Click the Make button to open the Edit Appointment screen and schedule an appointment for the patient, resource, and time currently selected on the grid. If Make is disabled, you may (a) not have a patient selected, (b) have selected a patient with no case, or (c) have selected a patient who is not eligible to be scheduled with the resource-domain combination currently placed in the column.
Make Multiple — Select multiple resource-time combinations on the grid (hold Ctrl) then right-click to display the Palette. Click the Make Multiple button to schedule multiple appointments (a) for different resources or (b) for the same resource and non-contiguous times.

The Make Multiple button will be disabled unless multiple blocks of time are selected on the grid. You can also schedule a multisegment appointment using the Make Multiple operation. See the Make Multiple Overview topic for more information.
Paste — Once you have Cut or Copied an appointment to the clipboard, the Paste option will become enabled. Right click the start time on the grid where you wish to create the new appointment then click the Paste button. See the Palette Options with Existing Appointments help topic for information about using Copy or Cut.
Block — Use Block times to schedule activities that are not related to patients (lunch, meetings, out-of-office time, etc.). Once created, Block times cannot be used to schedule patients. Block times appear by default as gray. The Block time default color can be changed upon product implementation. Users with the appropriate rights can change the Block color when the Block is scheduled. Right click a time on the grid then click the Block button to open the Edit Block Time screen. See the Scheduling Block Times help topic for more information.
Hold — Hold times are placeholders that reserve a resource's time for specific appointment types (for example, ensuring that new patients are only scheduled on Monday, Wednesday, or Friday afternoons). Hold times serve as visual indicators that can be found quickly on the grid and they are used by Find Appointment to quickly locate times for a specific appointment type. Hold times do not prevent other appointments from being scheduled for that time. Click the Hold button to open the Edit Hold Time screen. See the Scheduling Hold Times help topic for more information.
Blank — Select this option to free time that has been reserved by a template or shift schedule item (for example, to clear template block or hold times in a shift schedule). To view the time that has been cleared, right-click over the relevant resource column header and select Show Blank Appointments from the pop-up menu. See the Blank Appointment help topic for more information.
Cancel — Select an existing appointment on the grid then click the Cancel button to open the Cancel Appointment(s) screen. Select a cancellation reason and click the Cancel button to complete the cancellation. See the Cancel and No-show help topic for more information.
No Show — Select an existing appointment on the grid then click the No Show button to open the No Show Appointment(s) screen. Select the reason for the no show then click the Cancel button to mark the appointment as a no show.
Link — Use the Link option to combine separate appointments into one multisegment appointment or to re-link a de-linked segment after it has been edited or moved. A multisegment appointment allows you to schedule multiple resources as a single appointment or to schedule non-contiguous times as an appointment for the same resource. See the Multisegment Appointments and De-linking and Linking Multisegment Appointments help topics for more information.
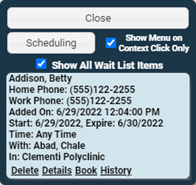
Wait List — You can display wait list items on the Palette by following the steps below.
- Right-click a time in a Resource column to display the Palette.
- Click the Wait List button. Note that the button label toggles to Scheduling. The patients who meet the wait list criteria for the date, time, and resource selection on the grid are displayed. If no patients meet the wait list criteria, check the Show All Wait List Items check box to display all patients on the wait list.
- Click the Scheduling button to exit Wait List mode and display the Palette's normal scheduling options.

See the Scheduling Patients on the Wait List help topic for a discussion of how to Book a patient on the wait list and how to use the Delete, Details, and History links associated with a wait list item.
Scheduling Palette Options with Existing Appointments
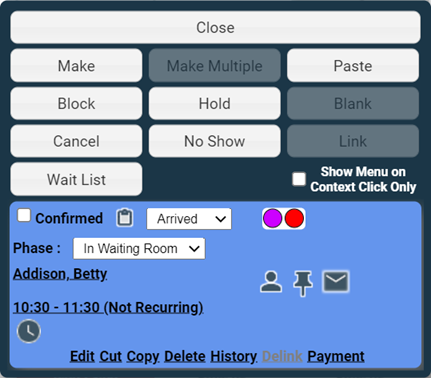
When you right click an existing appointment on the grid, the Palette displays additional appointment specific options as shown in the following image. See the Palette Options with Existing Appointments help topic for information.

