Cancel and No-show
Cancel and No-show are important status indicators for managing your appointment workflow in that they affect the bottom line of your organization. And WellSky Resource Manager gives users numerous workflow options for managing these throughout the program and provides a series of reports that you can use to monitor the appointment behavior. Manage status from the
- Grid scheduling interfaces: that is, the Scheduling Options menu or the Scheduling Palette
- Resource Column Headers
- Check-in Screen
- Appointments tab in patient and group demographics
Complete any of the following workflows to cancel or no-show appointments (the steps are identical for either cancel or no-show; just choose the desired option).
Scheduling Grid
- Locate the appointment to cancel.
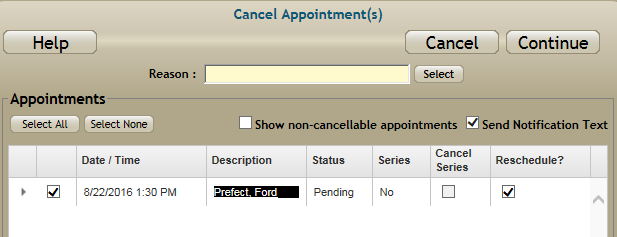
- Do one of the following to open the Cancel Appointments screen (or the No-Show Appointments screen).
- Right-click over an existing appointment. The options menu will appear. Select Status Actions > Cancel or Status Actions > No-show.
- Click the appointment once. The details will populate the scheduling palette. Click either the Cancel or No-show button in the appointment details panel.
- Click the Select button by the Reason field. The Reason Search screen will appear.
- Choose an appropriate reason for the current cancellation.
- Click the Send Notification Text check box if you want to send a text notification to the patient alerting them of the cancellation. Otherwise leave the checkbox deselected.
- If the appointment is part of a series the word Yes will appear under the heading Series. If you want to cancel the entire series, click the checkbox option under the heading, Cancel Series. Otherwise, leave it blank.
- Appointments provides the option to reschedule canceled or no-showed appointments. The default is to mark them for reschedule. The option appears in the last column in the Cancel and No-show Appointments screens. Accept the default, or click the checkbox option once to de-select it.
- Click Continue to complete the cancellation. Click Cancel to abort the procedure. The appointment will be removed from the scheduling grid.

Appointments Tab
See the Cancel and No-show on the Appointments tab and Cancel and No-show for Groups topics.
Check-in Screen
- Select Check-in screen from the Main menu.
- Navigate to the correct day using the Calendar.
- Locate the appropriate patient line item (sort the screen in whatever manner best suits your current need).
- Click the drop-down and select either Cancel or No-show.
- Repeat steps 3–7 outlined in the Options menu discussion above.
Canceling a Day from the Resource Column Header
- Select Scheduling > Grid from the Main menu.
- Right-click on the column header of the resource who requires cancellation (if necessary, place the resource in a column).
- Select Cancel Day from the options menu that appears. The Canceled Appointments screen will appear, listing all of the appointments for that resource on the given day.
- The default is that all appointments are marked to be canceled. Click the checkbox option next any patient who you do not want to cancel. This will de-select the option. Alternatively, use the "Select All Possible" (default setting) and the "Deselect All Possible" to change all of the options at once.
- Repeat steps 3–7 from the Options menu section above.
Useful Reports
- Reports > Daily Reports > Daily Cancellation List
- Reports > Daily Reports > Daily No-show List
- Reports > Statistical Reports > Cancellation Summary
- Reports > Statistical Reports > No-show Summary
- Reports > Statistical Reports > Company Totals
- Reports > Trend Reports > Appointment Activity
Key Considerations
- In order to cancel or mark an appointment no-show, the user must have Change Appointment Status set to Full (a subcategory of Appointment Operations). Additional rights are included for closing the day, editing treatment time (inpatient), and setting phases (custom statuses).
- Appointments that are canceled or no-showed are removed from the scheduling grid. They can be restored to a Pending, Arrived, or Seen status by navigating to either the Check-in screen or the Appointments tab and changing the status there.
- If you cancel a series and allow for rescheduling, the series cannot be rescheduled at one time. Rather, each appointment in the series must be scheduled one at a time.
- Appointments with payments attached can be canceled, marked no-show, or deleted, and the financial information for those appointments is not removed from the system.
- To manage payments or charges for canceled, no-show, or deleted appointments go to the patient’s Financials tab.
- The Cancel Day feature only cancels Pending appointments. Existing appointments that are marked Arrived or Seen are left alone. When only Arrived and Seen appointments are found, the program returns the notice that "there are no appointments to cancel for this day."
- Canceled information is stored in the patient history for statistical reporting, so don’t delete appointments if they are really a cancellation or a no-show. To ensure accuracy of the data the reports provide, Delete should only be used for scheduling mistakes.
