Resource Columns and Views
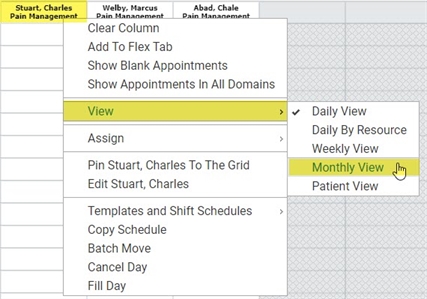
More than just a simple display of appointments, the scheduling grid presents several display options that are designed to help your scheduling workflow. The Daily View is the default grid configuration for all users. This view provides 10 nameable pages of 10 columns each. The page names appear along the top of the grid: Users simply click a page name to access that page and then arrange resources in whatever manner that best serves their current needs.

Users can change from the Daily View to one of the following at any point:
- Daily by Resource
- Weekly View
- Monthly View
- Patient View
Each of these is defined in the following. Keep in mind that the program will retain the last scheduling view a user selected. For example, if you log out while in the Monthly View, the next time you log in, the grid will display the Monthly View.
Placing a Resource in a Scheduling Column and Changing Views
To change the grid to meet a current task (for example, scheduling a series of appointments over an extended period of time), complete the following.
- Place the resource in a column. If the resource is currently in a scheduling column, proceed to step 2.
- Right-click the column header in which you want to place the resource (where the resource description appears)
- Select Assign Resource from the pop-up menu. The Resource Search screen will appear.
- Locate the appropriate resource, click the description once, and then click Select. Alternatively, double-click the resource description.
- Once the appropriate resource is in a column, right-click that column header.
- Select View and then choose the appropriate option for your current task in the fly-out menu:
- Daily View
- Daily By Resource
- Weekly View
- Monthly View
- Patient View
- Refer to the following discussion for a description of each resource option. Refer to the linked topic for a discussion of Patient View.

Daily View
The Daily View is the standard display for the scheduling grid: that is, the Daily View is what users will see when they log into the program for the first time.
Weekly and Monthly Views
The Weekly and Monthly Views are calendar views of the currently selected resource by week and month. Use these views to visually determine availability in the resource's schedule or to schedule a series of appointments over an extended period of time. Additionally, a Print Screen report of these views provides practitioners with a graphic listing of their schedule. As indicated, these views provide a single resource's schedule. The columns represent days not other resources.
The default Weekly View begins on Sunday. You may select a different start day of the week for the Weekly View by going to Preferences > Grid Preferences and changing the Weekly View Start Day of Week. See the Global Grid Settings help topic for more information.
Daily by Resource
The Daily by Resource option shows only the selected resource’s appointments for the selected date. The time slots (hours of operation) are listed as column headers. Block and hold times (if they exist) are listed in the first row. Patient appointments are listed in the second row. Use the scroll bar to view the resource’s entire schedule. If multiple operations are booked in the same time slot, an additional row is added to the grid so that each individual appointment can be viewed separately. For example, if three patients are double-booked for the same time, three rows of patient schedules will appear. Appointments that are not double-booked will appear in the first row only. Otherwise, when double-booked appointments do not exist, only a single row of patient appointments will be displayed.
Clear Column
The Clear Column option on the right-click menu of resource columns is simply a means of quickly clearing the data that is displayed on the grid. It does not delete or remove data from the database, it simply clears the display. Use it to quickly remove a resource schedule for reporting purposes.
See also Grid Column Menu.
