How to Drag and Drop Appointments
The drag and drop feature is one of two visual workflows WellSky Resource Manager provides to move appointments on the grid—the other being cut and paste. Using either of these, you can move appointments to a new time, date-time, or even a new resource. You just need to make sure that the scheduling grid is configured with the appropriate resource or patient column to display the appointment and, if necessary, the resource to whom the appointment will be moved. Then move the appointment according to the following instruction.
Single Resource Drag and Drop
To begin a drag-and-drop operation,
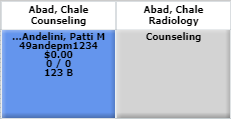
- Locate the appointment you wish to move on the scheduling grid. If necessary, place the resource in a column. The following example, uses an appointment for Patti Andelini.
- Place the cursor in the upper left-hand corner of the starting appointment cell until the "grab" icon appears.
- Click-and-hold the left mouse button down.
- While holding the mouse down, drag the appointment to the new start time.
- Once the new start time is highlighted, release the mouse button. After a moment, the appointment will be move to its new time (and resource, if necessary).


The icon looks like a miniature grid, as illustrated in the previous screen shot.
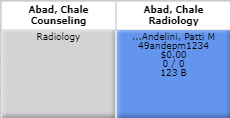
In our example, Patti was scheduled with the correct resource, but in the wrong domain. So we will move the appointment to the same time in Radiology.

Drag and Drop in a Series
If the appointment you are moving is part of a recurring series, there are some additional steps and considerations of which you must be aware. Consider the following example.
- Repeat steps 1–5 outlined above on an appointment that is part of a recurring series.
- As soon as you release the mouse button in step 5, a message similar to the following will appear.
- Select from among the following options:
- Apply to Series: Choose this option to apply the time and any resource change to the appointments in the series.
- This feature is forward looking only: Only those appointments from the start date of the move forward are affected. For example, consider a series that occurs every day from the 22d of the month to the 30th. If you move the appointment on the 26th and apply this option, only the 26th through the 30th will be affected.
- In addition, only pending appointments are moved. If you cancel one or more of the appointments in the series prior moving an appointment, they will not be affected by this procedure. Canceled appointments can always be managed through (a) Scheduling > Reschedule Cancel/No-show Appointments if the Reschedule? option was enabled or (b) the patients Appointments tab in patient demographics.
- Don't Apply to Series: Choose this option to simply move the selected appointment to the new time, resource, and/or date.
- Cancel: Choose this option to abort the operation.

Multiresource Drag and Drop
You do have the ability to move multisegment appointments on the grid, but there are some differences in the workflow and some additional limitations of which you need to be aware.
Drag and Drop with Different Start Times
When the segments of a multisegment appointment have different start times, you can complete the following operations:
- Move a single segment to a new time for the same resource
- Move a single segment to a new resource-time combination
- Move a single segment to a new date in the Weekly or Monthly views
If, however, your goal is to move the entire multisegment appointment, you do have the option to reschedule the appointment as part of the workflow so that the same relational order can be preserved.
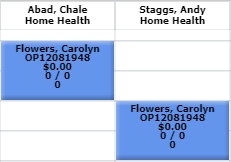
Consider the appointment illustrated in the following screen shot.

As an example, the Abad segment should begin at the same time as the Staggs segment. To complete this move,
- Place the cursor in the upper left-hand corner of the starting time slot (Abad at 7:00 a.m.) of the segment to be moved until the "grab" icon appears (as illustrated in step 2 of the first section above).
- Left-click and hold the mouse down.
- Drag the segment to the 7:30 a.m. time slot and release the mouse. A pop-up window similar to the following will appear.
- Choose one of the following:
- Continue: To complete the move of the single resource segment to the new time, click Continue. Using the example, all of the segments will now be scheduled concurrently.
- Reschedule: To move the entire appointment (i.e., all of the segments), click Reschedule. The Reschedule Appointment window will appear. Complete the parameters according to the Help provided (click Help in the Main menu).
- Cancel: Click Cancel to abort the move altogether.
- If the appointment is part of a series, complete the pop-up confirmation according to the instruction provided in step 3 of the "Drag and Drop in a Series" section above.


Use the same process of moving the segment to a different resource-time combination.
Drag and Drop with the Same Start Times
When all of the segments of the appointment start at the same time, the basic technique of moving multisegment appointments is the same as described above, but there are some workflow differences and considerations of which you need to be aware. Consider the example illustrated in the following screen shot.

If all you want to do is change the time of the appointment (or the date and time in the Weekly/Monthly view), then complete the following steps.
- Place the cursor in the upper left-hand corner of one of the segments until the "grab" icon appears.
- Left-click and hold the mouse down.
- Drag the segment to the new time and release the mouse. A pop-up window similar to the following will appear. (Note that this is a different message than in the previous example.)
- Choose one of the following:
- All Resources: If you want to move the entire appointment, click the All Resources option.
- Only [resource last name, first name]: If you want to move only the resource on which clicked and dragged, click the "only" option.
- Cancel: Click Cancel to abort the move altogether.
- If the appointment is part of a series, complete the pop-up window according to the instruction provided in the series section above.

Key Considerations
- To drag and drop an appointment, your scheduling profile must have the Appointment Operation "Move/Reschedule Appointment" set to Full. This setting must be configured in each domain to which you have rights.
- Time and resource changes affect all applicable dates when the "Apply to Series" option is selected. However, when moving an appointment from one date to another, only the date of the appointment used to begin the move is changed: The dates for the rest of the appointments in the series are left unaffected.
- You can drag and drop multisegment appointments only when each segment begins at the same time. Otherwise, you must use Reschedule to move the entire appointment, or drag and drop just a segment.
- If the segments begin at the same time and you move just one segment to a new resource, then the workflow will mirror moving segments that have different start times.
- Use drag and drop to move appointments (a) in either a resource or patient column or (b) the Daily, Weekly, Monthly, or Patient views. Simply apply the same criteria outlined above.
- When an appointment is part of a recurring series and you use cut and paste or drag and drop in Batch Schedule Edit Mode, you will not get the message (opportunity) to apply your changes to the series.
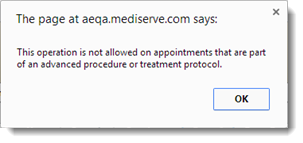
- You cannot drag and drop advanced procedures or treatment protocols. A pop-up similar to the following will appear when you try to do so:

