Global Grid Settings
Use these settings to configure the layout of the scheduling grid and the patient demographic information. By default, the Demographics panel and the Navigation Calendar appear along the left side of the scheduling grid. This layout can be changed using the options defined in the following.
Use Vertical Screen Layout On Grid Page
Select this option so that (a) the Demographics panel, Navigation Calendar, and clock appear above the scheduling grid rather than to the left of it.
Maximize Viewable Area
This option is activated when the "Use Vertical Screen Layout On Grid Page" option is enabled. Essentially, what it does is free the area in which the banner appears so the program has more space for demographic components (i.e., the area in which the company logo appears).
Show Analog Clock
This option simply toggles the analog clock that appears on the grid on and off. The clock is enabled by default. Click the option to de-select it and hide the clock on the grid.
Show Resource Efficiency
Resource efficiency is enabled by default: Click the option once to disable it.

The efficiency metric is calculated as a ratio of hours the resource is scheduled versus hours the resource is available, and then it is expressed as a percentage. Block times and Not Here times in shift schedules reduce the hours a resource is available. This statistic will only appear in columns for resources in domains for which the scheduler has rights.
When contemplating using the efficiency calculations, users should be aware of the overbook threshold that has been configured for their resources. The overbook threshold is a parameter that controls the number of patients that can be scheduled at the same time before the program treats them as a conflict. For a complete review, see the Resource Scheduling Information section of Adding/Editing Resources and Resource Threshold View.
Show Schedule Compliance
The Schedule Compliance option provides reference statistics in patient columns regarding the minutes/hours a patient has been scheduled on a given day in comparison to the treatment time required in order to receive reimbursement. It is primarily an Inpatient indicator as to whether a patient (a) has been scheduled for the treatment time required by Medicare and (b) how far along that patient is in regard to their scheduled therapy for the day. The option is enabled by default. Click the checkbox next to the option to disable it.
- Users must have the security right Scheduling Compliance set to Full in order to see these statistics, even if the option is enabled. This is a domain-level right. See also, Patient Schedule Compliance and Schedule Compliance Statistic.
- Only those appointments scheduled with resources who are of a type defined with the Appointments for Resources of this Type Will Count for Schedule Compliance option enabled are included in the metric.
- Compliance statistics are calculated only on the case used to define the patient column, so the Show Appointments for All Active Cases option in the patient column definition does not affect these.
Show Discipline Statistics
One of the features of case types is the ability to use procedure categories to define up to three disciplines of treatment and then use the hours scheduled for each of these disciplines as a display statistic at the base of patient columns. WellSky Resource Manager determines the time scheduled by adding the time for each appointment that is scheduled for a procedure belonging to one of the discipline categories.

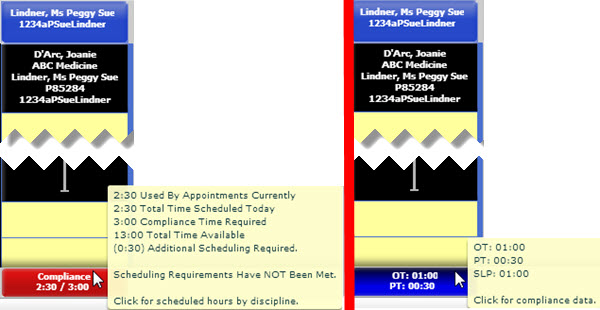
The left example shows the compliance statistics. As highlighted in the tooltip, click to show the scheduled hours. Statistics for the first two disciplines are now displayed at the base of the column. The third is displayed in the tooltip. Simply click again to return to compliance statistics.
- Discipline statistics are calculated only on the case used to define the patient column, so the Show Appointments for All Active Cases option in the column definition does not affect these.
- Any resource who is scheduled with a procedure that belongs to one of the disciplines defined for the case type is included in the discipline calculation. Contrast this with the compliance statistic (defined above), which is limited to resources of a type defined to count toward compliance.
Show Canceled Appointments
By default, canceled appointments are removed from the grid. However, users who wish to have canceled appointments continue to display on the grid can turn on the Show Canceled Appointments grid preference. The reason for the cancellation or no show will also display on the grid and when hovering over an appointment on the grid. See the Display Canceled Appointments on the Grid help topic for more information.
Static Grid Now Line Pinned To
By default, the Now line displays on the Grid at the current time. The Static Grid Now Line Pinned To option allows you to customize the location of the Now line on the Grid by selecting one of the following options.
- Top Quarter — the Now line displays about 1/4 of the way down the Grid
- Middle — the Now line displays about 1/2 of the way down the Grid
- Bottom Quarter — the Now line displays about 3/4 of the way down the Grid
When the Now line approaches the top or bottom of the grid day, it will deviate from the configured position when the grid can no longer scroll to keep it there. A system administrator can copy a user's Now line preference to another user's settings via Data Maintenance > System and Security > Copy User Settings.
Obfuscate Patient Names Method
This feature is a means of masking patient names on the user's monitor: for example, you might use it to protect PHI on a monitor being used as a scheduling white board in a treatment unit. This option will limit the degree to which the patient's names are displayed on the scheduling grid and in the tool tips. Click the drop-down menu and choose from among the following options:
- None
- Remove 50% from
- Leave 2 or Fewer
The patient names are not truncated in any way.
Name Parts
Last Name Only
First Name Only
As per the description, the program will truncate half of the patient's name or half of the First or Last name, whichever is selected.
Letters
Letters from Last Name
Letters from First Name
As per the description, the program will use the first two letters of the patient's name or of the First and Last name, whichever is selected.
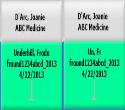
Compare the before and after in the following screen shot as an example of how patient names appear normally and when the first two characters are truncated.

Auto Expand Overbooked Columns
This option controls whether resource columns are automatically expanded on the grid when patients are double-booked (overbooked). The feature is disabled by default for end users, but it is enabled by default for static users. See also, the Resource Threshold View.
Default Grid Print Scale Mode
Use the Print Scale configuration settings to control how the Print Screen report is output to your printer. Choose from the following options.
- Best Fit (Fill Page): Use this option so the program will automatically scale the Print Screen report for the best fit for the paper. The printing subsystem tries to determine if the best fit would be the page width or height, taking the paper dimensions and aspect ratio (portrait or landscape) into consideration. Normally, it uses either the height or width, not both.
- Fit Page Width: Use this option to scale the report so that width of the grid fits the width of your paper. Depending on the paper size and aspect ratio selected, the bottom half of the grid may print on a separate page.
- Fit Page Height: Use this option to scale the report so that the entire length of the columns of the grid fit on one page. Depending on the paper size and aspect ratio, only a fraction of the total number of columns may fit on a single page: e.g., 6 of 10 columns. The balance will be printed on a separate page.
- Scale to Page: Select this option to scale both the height and width of the grid to fit a single page.
- No Scaling: Choose this option to suppress any scaling. Depending on the paper size and aspect ratio selected, multiple pages may be necessary to print both the height and width of the grid.
In that printers have their own characteristics, experiment with the settings to determine the best setting for your printer and needs.
Grid Scroll Speed
This options affects how quickly you can scroll vertically through the grid with your mouse. It is set to Medium by default. Select one of the following options from the drop-down list.
- Very Slow
- Slow
- Medium
- Fast
- Very Fast
Force High Latency Workflow
This option determines whether the Show Menu on Context Click Only check box displays on the Scheduling Palette as follows.
- Checked — the Palette's Show Menu on Context Click Only check box is hidden.
- Unchecked — the Palette's Show Menu on Context Click Only check box is displayed.
Weekly View Start Day of Week
This option allows you to configure which day of the week starts the weekly view on the scheduling grid. The default start day is Sunday. To change the start day, select a different day of the week from the drop-down.
