Scheduling Basic Appointments
The core scheduling tool in WellSky Resource Manager is the grid. Similar to an old-fashioned scheduling book, the grid is a highly visual, straightforward picture of patient-resource appointments. Unlike a book, the scheduling grid is a highly customizable, dynamic tool that is used not only to schedule but also to manage the appointments and the patients who are scheduled.
All that the system requires to schedule a patient on the grid is that both the patient and the resource have been entered into the system, the resource has been placed in a scheduling column, and the patient has a case. Then it is simply a matter of selecting a time slot on the grid and selecting Make from either the Options menu or Scheduling palette. Use the following instructions as a simple guide to basic scheduling.
Select a Resource
Resources are defined: (a) first by resource type, (b) second by the individual resources of a given type, and, if necessary, (c) by the domains in which the resource can be scheduled for an appointment.
To place a resource in a column header on the scheduling grid:
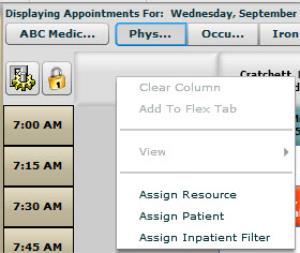
- Right-click the column header where you want to place the resource.
- Select Assign Resource from the popup menu.
- Complete the search parameters:
- Double-click the resource description once he or she is located. Alternatively, click the resource description once and then click Select. The grid will refresh and place the resource in the column on which you clicked.


The Resource Search screen will appear.
Domain: Click the drop-down in the Domain field and then select the domain from which to pull the resource. Ignore this option in Clinic versions. (Only scheduling domains are shown in the Resource Search.)
Resource Type: Click the drop-down and select a type from the available options.
Search by Filter: The is search term for resources is Description. Click the drop-down to choose ID as needed. See also, the Data Search Review topic for additional search options.
Search For Field: Enter all or part of the resource's Last Name or ID in the Search field. The results panel of the search screen should update with those resources that most closely match the text you enter
Select a Patient
To select a patient:
- Do either of the following to open the Patient Search screen:
- Click the Select a Patient
 icon in the Demographics panel, or
 - Begin typing the patient's last name.
- Continue typing patient’s Last Name in the Search For Field until the patient has been located.
- Double-click the patient's description, or click the description once and then click Select to choose the patient. The demographic panel will refresh with the selected patient's information and the patient will be ready for scheduling.
Patients with Multiple Cases
If a patient has more than one case, verify that the correct case was selected. Click the drop-down in the Case ID field to display the available cases and select the appropriate option. In addition, if the case has any authorizations that are in effect, you can view them by clicking the Auth link. This Authorizations screen in case demographics will appear.
Schedule the Appointment
Once the resource has been placed in a column and the patient has been selected, you can schedule an appointment.
- Be sure that the program's focus is on the scheduling grid. If necessary, select Scheduling > Grid from the Main menu.
- Select the time in the appropriate resource column. If necessary, click-and-drag to select multiple time slots.
- Right-click on the appropriate grid cell then select Make from the Scheduling Palette.
- View the appointment on the grid.
- If the Edit Appointment screen is configured to appear on make functions, complete the options there as appropriate and then click Continue to complete the appointment. Otherwise, the appointment will simply be scheduled.
- Any conflicts that are detected will produce a conflict resolution screen so that you can resolve them according to your own business rules.
- The text displayed in the cells will be whatever display fields that have been assigned to your user profile. Additional time slots display a bar with a stopping point to indicate that the appointment continues.
Key Considerations
- Both the patient and resource you want to schedule must be selected.
- Your ability to schedule appointments is determined by the profile assigned to your user account, which is defined by the system administrator.
- Users (like resources) are assigned to domains and the rights those users have to schedule and maintain data is determined by the security profile linked to each domain assignment. For example, a user may have Full scheduling rights in one domain, but only the ability to view appointment data in another domain.
- Users can schedule appointments only for those resources that are also assigned to the domains (a) to which the users have been assigned and (b) in which the users have scheduling rights.
