Patient Column
A patient column is a scheduling and display feature that presents users with a patient's daily schedule at a single glance (weekly and monthly views are available). This feature is most useful for inpatient settings or disciplines where it is important to know what treatment the patient is receiving during the course of a day. However, the feature is useful to any organization in which a client might be scheduled for a day and needs to be tracked throughout the course of extended treatment or service.
If you would like to see all patients scheduled with a selected domain for the current date without having to manually pin patients to the scheduling grid, select Preferences ![]() > Apply Today View then select a domain from the Today View Mode Settings screen. See the Today View / Daily View help topic for more information.
> Apply Today View then select a domain from the Today View Mode Settings screen. See the Today View / Daily View help topic for more information.
Assigning a Patient to a Column
To begin,
- Navigate to the appropriate scheduling page.
- Right-click over the desired column header.
- Do either of the following:
- If the column is currently blank, choose Assign Patient.
- If a resource or patient is currently placed in the column, choose Assign > Assign Patient from the pop-up menu.
- Complete the parameters according to the following descriptions and definitions:
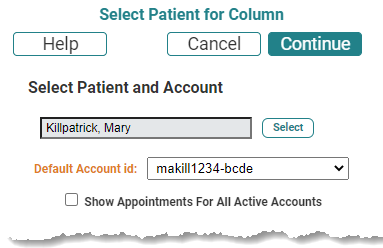
- Patient: If the patient is incorrect, click the Select button to choose an alternate.
- Default Account ID: Verify that the selected account is correct. If not, click the drop-down and choose the correct alternative. By default, the WellSky Resource Manager will use the last account created, so if the patient has multiple, active occurrences be sure to use the correct one. The statistics that are displayed in a patient column (e.g., compliance and discipline) are based solely on the case you choose here.
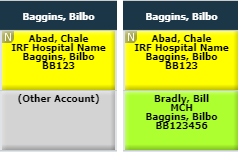
- Show Appointments for all Active Accounts: Enable this option to include appointments for all of the patient's active cases. This is purely a display feature, providing information about the patient's schedule. The statistics (see Default Account ID) that are displayed in the column are not inflated by displaying appointment information for other cases. The difference in the display is illustrated in the following screen shot.
- Open Time/Close Time: Mouseover the Hour or the Minute fields to display a time “spinner” and adjust the time as needed, or enter the hours in minutes in the appropriate text fields.
- Time Slot Length: Set the time slot length (i.e., the duration of a single appointment cell) for the patient by clicking the drop-down and choosing the appropriate duration. Note that if you enable the 24-hour Scheduling option, the program will set the Open and Close times automatically.
- Set Default: Click the Set Default button to configure the edited times as the default for subsequent patients that are assigned to a patient column. They will remain the defaults until such time that you change the settings manually.
- Click Continue once you have finished. The grid will refresh with the newly placed patient.
The Select Patient for Column screen will appear.
Select a Patient and Account: The information for the patient currently selected on the grid will populate the fields automatically.

If a case type has been assigned to the patient's case, it will display in parentheses along with the ID in the field. This information is also displayed in the case fields on the Demographics Panel and on the Edit Appointment screen.

The left example has the option is disabled; the right, enabled.
Inpatient filters that are used to create patient columns may have this option enabled already, so that the "show all" option is enabled automatically (see the Inpatient Column topic).
Column Settings: Accept or adjust the current default settings as necessary.


See the Help topic Patient Column Display Fields (User) for a discussion of the display fields used in column headers.
Right-click Menu for Patient Column
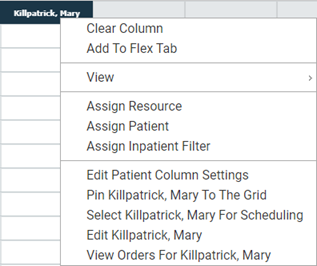
Once a patient has been placed in a column, some additional menu items become available from the right-click menu on the patient column header.

Edit Patient Column Settings: Select this option to change the Case ID, hours for which the patient is available to schedule, or the time slot length for the column.
Pin: [patient last name, first name middle name]: Click this option to pin the patient currently placed in the column.
Select [patient last name, first name middle name] For Scheduling: Click this option to select the patient currently placed in a column. Their information will populate the Demographic Panel.
Edit [patient last name, first name]: Click this option to navigate to the patient demographic screens for the patient currently placed in the column.
View Orders for [patient last name, first name]: After assigning a patient or an inpatient filter to the column header, this link will appear. Click the link to navigate to the Patient Orders screen where you can view the patient's orders. This link only appears if your Orders Handling security profile is set to Full or Read-only for the domain associated with the case (account).
Key Considerations
- Be sure to set Open and Close times that will correspond to the resources with whom the patient will be scheduled.
- Keep in mind that you will want to select a time slot length that is a divisor of the time slot lengths for the resources with whom the patient will be scheduled to avoid conflicts.
- Click the header of the patient column (i.e., patient description) to expand the details of double-booked appointments, much like resource columns.
Note: To schedule block times over existing appointments in a patient column, you must have block rights in all of the domains in which the appointment over which you are booking the block is scheduled.
- See Patient Column Display Fields (User) for a discussion of the column headers.
