Quick Registration (Quick-Reg)
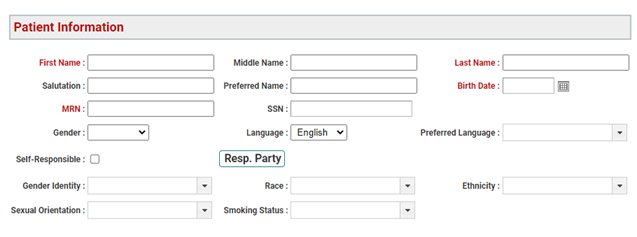
Quick Registration is an alternative, simplified patient registration workflow to the standard patient registration provided in Demographics > Patient Demographics. Through the Quick-Reg configuration, administrators can configure a registration workflow that reduces the data that users must enter to create a new patient. For example, the following illustration shows the default configuration of Quick-Reg.

Patient Notes are not required, but the Patient Note Information panel appears in the basic configuration by default. Simply click the header to expand the panel.

Additional panels of demographic data will become available as administrators modify the Quick-Reg workflow in Required and Suggested Fields.
Key Considerations
- The panel title (Patient Information in the above screen shot) appears in red text because users are required to complete information in the panel in order to save the patient record. The fields that the users must complete are also set in red—First and Last Name. These are the only two fields that are ever required by the program to save a patient record. If the only intended use is to provide a quick means for personnel to register a new patient, no further configuration is required.
- Cases are not created by default through Quick-Reg: Administrators must configure the Case Information panel to appear.
- The System Settings option New Patient Case Mode does not affect the Quick-Reg workflow. Rather, the screens and the corresponding data fields that the administrator has configured to appear in Data Maintenance > System and Security > Required Fields determines the workflow.
- The Extended Demographic Fields identified in the Patient Demographics help topic, will only display on Quick Reg if they are configured to do so by a System Administrator.
Registering a Patient through Quick-Reg
- Select Demographics > Quick-Reg a Patient from the Main menu. The Quick-Reg screen will appear.
- Enter data in the panels that appear according to the workflow established in your organization. Take the time to complete as much information as possible, but be sure to address as many of the Suggested fields as possible and complete all of the Required fields.
- Decide whether to Go to Grid on Save. The option is enabled by default. Click the checkbox once to disable the option and remain in the screen for additional patient entry.
- Click Save to complete the patient entry. If the record was completed according to the configured workflow (i.e., all the necessary fields were completed), a confirmation that the patient was successfully saved will appear. Otherwise, you will be prompted to either complete all of the required fields or to complete a specified field (e.g., Authorization Visits cannot be set less than the warning threshold).
Key Considerations
- The saved patient description will appear
in the Recent Patient/Group
 list
which is accessed from the Patient
Demographics panel. Click the icon and select the patient from
the list to continuing working with them.
 - Fields that are configured as Required or Suggested affect both standard patient registration workflow and the Quick Reg workflow. If, for example, you require the Social Security Numbers (SSN), then you must complete the SSN regardless of the registration process you use.
- Data entry panels appear in Quick Reg only if the data that appears on those panels is configured as required or suggested.The standard patient demographic workflow includes the entire set of patient data entry forms regardless of requirement.
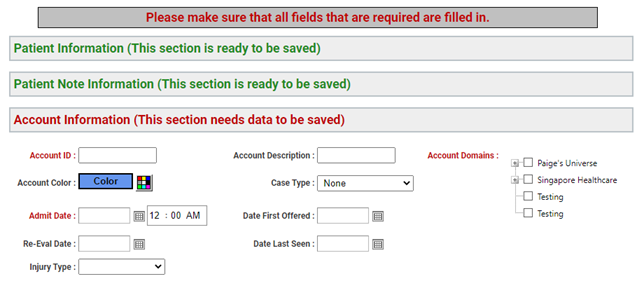
- Any attempt to save an incomplete record in Quick Reg will prompt the user to "make sure that all fields that are required are filled in." The panels that contain the fields will appear expanded. Those that are complete will appear closed with the message "panel title (This section is ready to be saved)."
- Users can configure their default patient registration workflow in Preferences.
- Click the Preferences link on the Main screen or click the Presets and Preferences icon at the top of the Time Column, and make sure that the General Options tab is in context.
- Locate the option
- Click the checkbox once to enable the option. Leave it blank to use the standard patient registration workflow.
- Patient Reminder options appear in Quick Reg on the Patient Contact Information panel, but in order to display this panel, some contact information such as a phone number or an e-mail address must be set to Suggested or Required.
- Active MR Number and Case ID generators are honored in the Quick Reg workflow when Auto ID is enabled.

Automatically use Quick Reg when clicking the 'Create a New Patient button on the grid.
Side Note Regarding Case Contact Data Entry
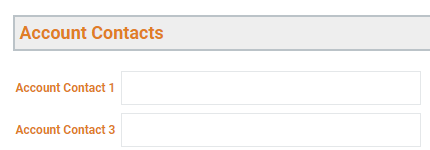
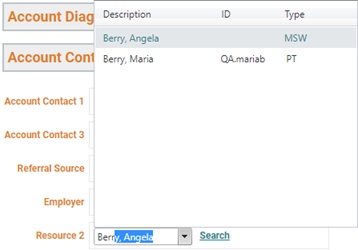
Should your organization (a) choose to use Quick Reg and (b) assign any of the case contact fields as Suggested or Required, you will notice that data selection has been modified to speed up the entry process. Consider the following example:

To select data:
- Click the field once. A text field with a drop-down and Search link will appear.
- Do any of the following:
- Type all or a portion of the Last Name of the contact/resource that you want to associate with the patient record. As soon as you stop typing, the program will populate the field with the contact/resource that matches what you have typed.
- If more than one item shares the text string you have typed (e.g., you type House and your system contains both a Charles House and a Kelly House), the first contact/resource matching the text will populate the field and a fly-out menu with additional options based on the text entered will appear.
- Press enter to accept the first item or click the description of the desired contact/resource. As an alternative, you can continue typing the contact/resource name until their description appears in the field (e.g., House, K to select Kelly House).
- Click the expand button to display all of the possible contacts/resources that could potentially populate the field, and then click the appropriate description.
- Click the Search link to display the corresponding Search dialog to locate and select the wanted option.


Key Considerations
- When using this type of data selection, you may want to consider associating the contact or resource fields with the appropriate type if no association currently exists. This will filter the available options to only those that are appropriate for the given contact/resource field. Otherwise, when you type Smith for a Primary Physician contact, for example, the program searches all of the contacts that are Smiths, whether they are Primary Physicians or not (unless, of course, that is the behavior that you desire). Or similarly, when you use the drop-down, options that are not of the correct type will appear (e.g., Chaser, Barry A is an Attorney, not a Primary Physician in the above screen shot).
- Use the ID and Type in the fly-out menus to further distinguish contacts/resources with similar names.
