Advanced Patient Search
Advanced patient search provides users a sophisticated search utility that provides multiple options (to be used alone or in combination) to locate patients anywhere within the database. In addition, some organizations will find that it is useful to integrate advanced search in their new patient registration workflow to prevent duplicates. The search criteria consist of the
- Last Name
- MR Number
- Social Security number
- Birth Date
- First Name
- Account/Case ID
When combinations of the criteria are used, only those patients who match all of the criteria provided will be displayed, which can be very useful for filtering large amounts of similar data (e.g., in organizations with multiple Smiths or Johnsons). The more information users provide, the more refined the search. In addition to being a detailed search utility, advanced patient search can also locate and retrieve patients from the archive in one seamless operation. So no matter what your current need might be, this utility can be used routinely to locate and select patients in your database.
Using the Utility
- Click the Advanced
Patient Selection
 icon
in the demographics panel. The Advanced
Patient Search screen will appear.
 - Enter the relevant patient demographic information in the fields provided.
- Choose whether to enable any of the additional patient filters:
- Identifying the patient if, for example, you have patients with similar names.
- Identifying potential duplicate entries if, for example, the patient has more than one active case. There is a potential for patients to have more than one active case if the patient is receiving treatment for separate incidents and the organization's workflow is such that they use a separate case for each incident of care.
- Identifying whether the patient has had other occurrences of treatment in your organization when this filter is used in combination with the inactive patient filter. That is, you will see discharged cases when both are checked.
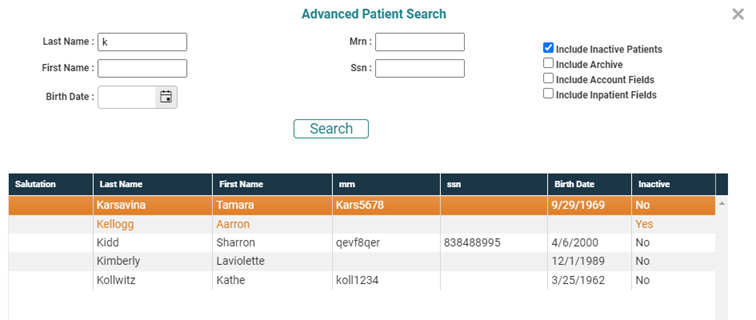
- Click the Search button to locate the patient. The screen will refresh with the results, similar to the following example.
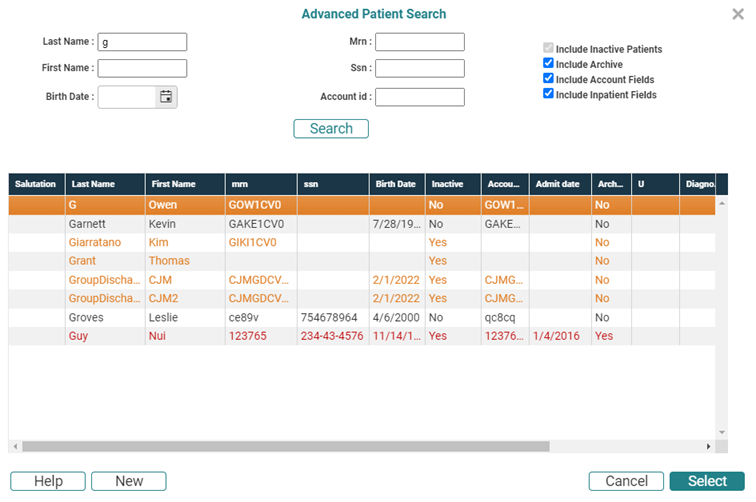
- As additional information is included in the results, a scroll bar will appear at the bottom of the results panel as needed. Use this to view the case and inpatient information for the patients.
- Information in the results panel can be sorted on whatever column you wish—e.g., click the First Name column to sort patient alphabetically by first name. Click the column again to switch from ascending to descending order. The utility retains the last sort column and the direction of the sort used.
- When a patient is selected from the archive, a message similar to the following will appear: "You chose a patient from the archive. Do you want to unarchive them?"
- Click OK to continue with the patient retrieval. Click Cancel to abort the retrieval.
Include Inactive Patients: Enable this option to include patients who (a) do not have a case or (b) who have only discharged cases. Patients who meet these criteria will appear in either blue or red text respectively, and "Yes" will appear in the Inactive column.

Keep in mind that if a patient has an active case at all, that patient will not show as inactive—even if he or she has discharged cases.
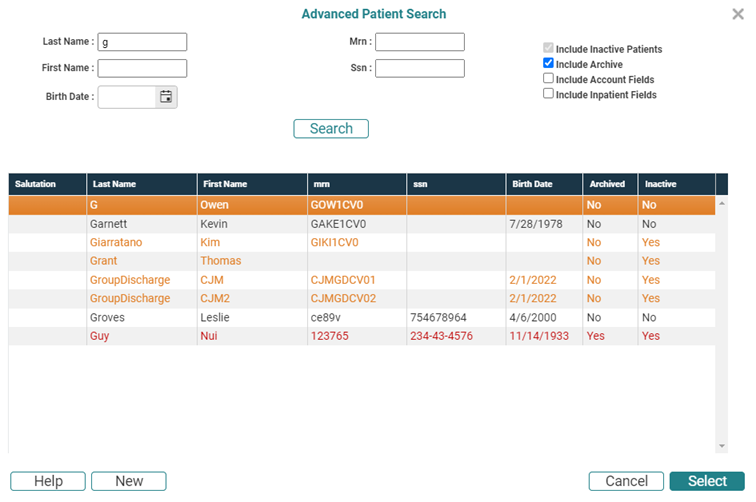
Include Archive: Enable this option to also include patients who are in the archive database in your search. Note that if you enable this filter, the "Include Inactive Patients" filter will be enabled automatically and the ability to toggle it off will be disabled. Patients that are archived and match the search criteria will be listed in red text and "Yes" will appear in both the Archived and the Inactive columns.

Note that Jamie Killjoy now appears in the results panel. We know she is from the archive because of the Archive column.
Include Account/Case Fields: Enable this option to not only include a Account parameter to use for filtering patient but also a Account ID column in the results panel.

This feature is useful in:
Consider the following example in which both the inactive and case filters have been enabled.

The patient Mary Killpatrick appears twice in the results panel: (a) once for her discharged case and (b) for her active case. When you select a patient who has multiple cases, verify that the correct case is selected (has context) before you schedule or run reports on that patient. Case selection is not automatic.
Include Inpatient Fields: Enable this option to display the inpatient fields—that is any assigned unit, room, bed, program etc.—for an active inpatient record in the results panel.

Patient Housekeeping
At the point that you retrieve a patient from the archive, users need to edit the case to either (a) undischarge the old Account/Case ID or (b) create a new one.
- Navigate to the patient demographic screens and select the appropriate patient (if the current patient is not the one you unarchived).
- Click the Accounts/Cases tab.
- Click the Include Discharged Accounts option.
- Once the screen refreshes, click Edit in the line item for the account appropriate to your current need. Click the Undischarge button.
- Complete or edit the Case Information as needed.
- Click Save to commit your changes.
Once an active account has been created, the patient is ready to be scheduled.
