Inpatient Column
The inpatient column, remember, is essentially a filter that reserves a column on the grid for patients (a) whose inpatient information matches the filter criteria or (b) whose inpatient record is associated with the team that is defined in the filter. As patients who match the filter criteria are registered, the column is automatically transformed into a regular patient column for that patient.
- If you apply a filter for a nursing unit and room-bed combination, for example, that column will automatically display the patient information for whichever patient occupies that same room and bed. If it is unoccupied, it will simply show the filter criteria (i.e., the unit, room, and bed).
- If you apply an inpatient filter for a team, then the column will display the next available patient member of the team (in alphabetical order) not currently in a column on that page. If there are no patients on the team for which the filter is created, then the column will simply display the team name. See Teams.
To create an inpatient column filter,
- Navigate to the scheduling grid: e.g., select Scheduling > Grid from the Main menu if necessary.
- Right-click over the column header where you would like to apply the filter.
- Select Assign Inpatient Filter from the right-click menu. The Select Inpatient Filter for Column screen will appear. If the column is currently populated with a resource, select Assign > Assign Inpatient Filter.
- Complete the parameters according to the following instruction:
- Nursing Unit: Click the drop-down and choose the appropriate unit for the column filter.
- Room: Click the drop-down and choose a room.
- Bed: Click the drop-down and choose a bed.
- Configure the Open and Close times for the column.
- Configure the Time Slot Length for the column. If the user chooses 24-hour Scheduling, the Open and Close times will be configured automatically.
- If desired, click the Set Default button to use the current column settings as the default for all patient columns. Once enabled, subsequent filters will use the same column settings automatically. Of course they can always be modified at any time.
- Click Continue.
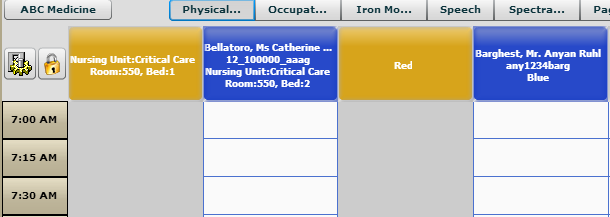
- The first column in the example illustrates an inpatient column filter with its corresponding parameters.
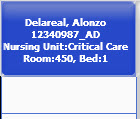
- The second column illustrates an inpatient filter populated by a patient.
- The third column illustrates an inpatient column filter with the team override enabled: i.e., the Red team.
- The final column illustrates a populated team column filter: i.e., the Blue team.
Inpatient Selection
Team: As an alternative to a unit and room-bed filter, click the drop-down in the Team field to associate a team with the column filter.
Show Appointments for All Active Cases: Enable this option so that whenever a patient who meets the inpatient filter criteria populates the column, the appointments for all of their active cases are shown in that column, not just those for the case on the inpatient record. Basically, when you enable this option you are automating the same option that appears on the patient column dialog (see the Patient Column topic).
Column Settings
The grid will refresh with the following elements according to the filter type and the current patient population.

Key Considerations
- Inpatient columns appear in Orange until they are populated with a patient who meets the filter criteria. Patient column headers always appear in dark blue. As a patient is admitted that meets the filter requirements, the labels (other than patient description) displayed in the column header convert to the first two labels defined in Preferences > Display Fields > Appointment Display Fields.
- Inpatient scheduling is a feature module that must be turned on through your program key in order to be available. That is, it is part of your sales agreement.
- In order to create an inpatient column filter, both Inpatient Data and Team data must be defined
- A patient will populate the column only if the corresponding inpatient demographic data is complete and matches the filter:
- Patients populate team inpatient filters in alphabetical order. For example, if the patients Jones and Smith are created, then Jones will populate a column before Smith.
- Of the four inpatient data elements mentioned, only the Nursing Unit is required by the program to complete a patient's inpatient record. Administrators should consider configuring the others as required for their organization in order to ensure that inpatient information automatically populates any inpatient column filters that you may use.
- The column header in an inpatient column will display up to four (4) lines of text. The first two line are composed of the first two display fields that come from the patient's demographic and case information. The third line is hard-coded to Inpatient 1, which by default is Nursing Unit. The last line is hard-coded as a concatenation of Inpatient 2 (room)and Inpatient 3 (bed), separated by a comma.
Nursing Unit
Room
Bed
Start Date
For example, even if (a) the unit, room, and bed are complete and (b) match a column filter, if the start date is blank, that patient's information will not populate the inpatient column.

- Inpatient column filters can also be added to a Grid Page Preset so that any time the preset is applied to a scheduling page on the grid, the designated column becomes an inpatient column.
