Patient Search Review
WellSky Resource Manager offers a number of options for locating and selecting patients to schedule and manage. Which workflow you choose will depend on where you are in the program and your own preference. We will begin our review with the patient select from the patient's demographics panel. To begin,
- Navigate to the grid by selecting Scheduling > Grid from the Main menu.
- Click the Select a Patient icon
 in the Demographics panel. The
Patient
Search
screen will appear.
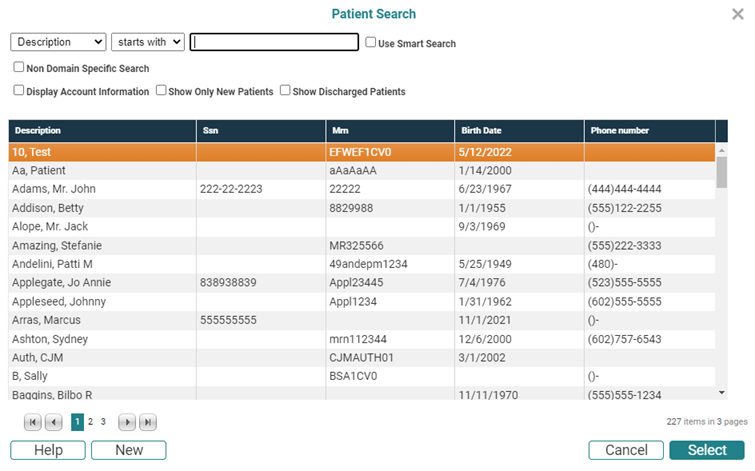
 - Use the following descriptions and definitions to use and navigate the Patient Search screen:
- Search Criteria or Search Term: The default configuration of Patient Search uses Description as the default search criteria (or term) to locate patients. That is, users type the patient's name in the format of Last Name, First Name in the Search For field. To choose an alternative focus for your search, click the drop-down and select any of the following options:
- Starts with: The default configuration of Patient Search looks for patients where the Search Criteria "starts with" whatever the user types in the Search For field. For example, if you choose SSN, and then type 555, the search screen will refresh to show all patients who have a social security number that begins with 555. As alternative, you can click the drop-down and choose "contains."
- Search For: The Search For field is the text field where users type the text they are using to locate the patient. Note the highlighted field with the numerical text 555.
- Patient Search is prepopulated with the first 75 patients in your database. If more than 75 results are available for any search that you perform, then some page controls and the number of items are displayed below the results list table (illustrated in the following).
- Once you have adjusted the Search Criteria and decided whether to locate patients that "start with" or "contain" the text you enter, begin typing your search text in the Search For field.
- Once the correct patient has been located, do either of the following:
- Double-click the patient description
- Click the patient description once and then click Select.


The search screen will refresh according to your selection: If, for example, you select SSN, patients are listed in order by SSN. Patients whose SSN is blank are listed first.

Then, when you type in the Search For field, the search screen will refresh to show all social security numbers that contain 555, not just those that start with those digits.

Upon entering the search screen, the cursor automatically has context in the Search For field. So if the default search parameters meet your needs, you can simply enter the text for which you are searching.

Note that the number of
items in your search are indicated by
"x items in y pages" at
the bottom right of the form. This is illustrated in the previous screen
shot by 227 items in 3 pages. Use the single arrows ![]()
![]() to scroll through the results a page at
a time. Alternatively, click a page number to move to that page of the
result set. Use the "break" arrows
to scroll through the results a page at
a time. Alternatively, click a page number to move to that page of the
result set. Use the "break" arrows ![]()
![]() to move to the first or last page of the
current search result.
to move to the first or last page of the
current search result.
If the patients exceed 1,000 results, searches are limited to 1,000 results will appear at the bottom right.

For example, if we enter K in the sample database, the patient list will refresh to look as follows:

And if we continue to type until we have Kim in the search for field, then the results will look like

The screen will refresh with the selected patient's information in context in the demographics panel.
Patient Search Screen Options
Some additional filter options are provided on the patient search to help not only with locating patients but also with efficiency in searching. Use the following descriptions and definitions to apply these options:
- Non Domain Specific Search (domain-only products)
- Patients who do not have a case. In these situations, users will be able to select the patient and create a case for them if they have the appropriate case security rights.
- Patients whose case is assigned only to a domain in which the user has no rights. In these situations, user can select the patient and create a new case if they have the appropriate case security rights. However, they cannot select the patient and schedule/edit the case assigned to the domain in which they no have rights.
- Display Case Information
- Show Only New Patients
- Show Discharged Patients
- Use Smart Search
- New Button
Think of this as the "show everything" option. For example, the search dialogs generally filter data by the domain to which a user is assigned. But rather than a restriction, this is used more for efficiency in filtering the data—consider a user in PT who only wants to see the relevant procedures assigned to the PT domain. However, if that user needed to see all the procedures in the database, she could check this option.
In the case of a patient search, checking this option will display
When the Display Account Information option is selected, one row per patient account will display in the results grid for patients who have multiple accounts. In addition, Case ID, Case Type, and Domains columns will display in the results grid. If the user has an account with multiple domains, the domains will display in a comma separated list in the Domains column.

Enable this option to include only new patients in your search: New patients are those that have never been scheduled.
Enable this option to include discharged patients in your search. Discharged patients are not removed from the database, but they do not automatically appear in the active patient searches or lists unless this option is selected.
Smart search adds some logic to patient searches so that if the current search term (e.g., Description) does not return a result, the program will the automatically determine whether the text the user has entered matches one of the other options (MR Number, SSN, or Birth Date).
For example, if smart search is turned off and the search criteria is Description, then the program will only ever look at data in the patient's Last Name field as text is entered in the Search For field.
Alternatively, when smart search is turned on, the program will look at the current search term for a match, and if none is found, it will move on to the other terms in an attempt to locate a match.
For example, if your current search criteria is Description and you enter something similar to 123- (prefix to a SSN) or 12/25 (the beginning of a date—format mm/dd/yyyy), the search will adjust what patient data it looks at to locate matches. That is, as soon as a user enters something that looks like the beginning of a SSN, for example, it looks in patient SSN for a match. Or as soon as it sees what appears to be a birth date, it will look at patient Birth Date for matches. The process continues until dates matching the text are located or until all possibilities are exhausted and no match is located.
The default setting on patient searches is enabled. Click the checkbox once to disable it. Then the next time you enter Patient Search, it will be disabled.
Click New to enter a new patient. The program will launch the patient demographic screens with the Demographics tab in context.
An Alternative Method for Invoking Patient Search
Perhaps the simplest, most straightforward method for locating a patient when you are on the main screen of the program is to begin typing information that corresponds to any of the following criteria (terms):
- Description or patient's last name (alpha)
- MR Number (any alphanumeric coding system that you use)
- SSN (xxx-xx-xxxx)
- Birth Date (mm/dd/yyyy)
Please note that the option "Use Smart Search" must be enabled for the following to work. To begin,
- Navigate to the scheduling grid.
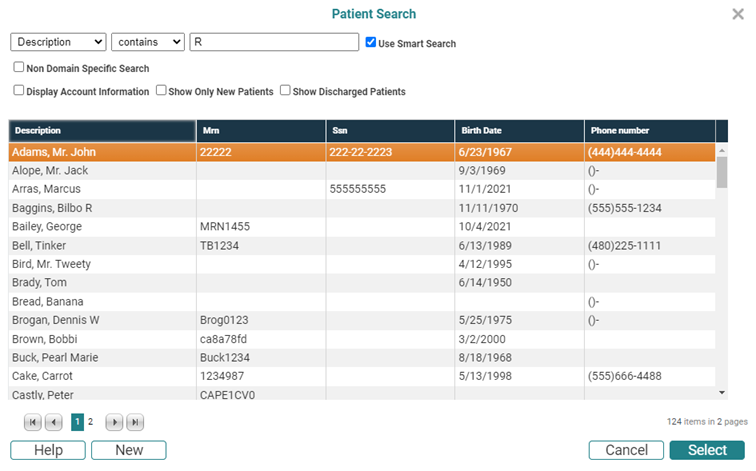
- Begin typing text matching whatever search criteria you wish to use. For example if you type l, the Patient Search screen will appear with patients whose last name begins with l. If no Last Name matches were located, the search would move on to check the MR Number to determine if any of those started with l (MR Number is the only other criteria to potentially contain alpha characters). Consider the following examples:
Type R to begin the search. This returns results similar to the following in the sample database.

But if we continue typing and enter 3, the search logic "knows" that no Last Names begin with R3, but finds a potential match on the MR Number:.

Note how the search term changes from Description to MR Number as the search switches focus.
Another example shows how the search dynamically switches from MR Number to SSN. If we begin a search by typing 555 on the grid, the patient search displays one matching record for MR Numbers.

But as soon as we type the dash (hyphen), the search "knows" that format appears to be standard SSN format and switches the focus. As a result, patients whose social security number begin 555- are displayed.

The previous two examples purposely use similarly formatted data to illustrate how the search utility will employ its "best guess" as to the type of data on which you are searching based on standard assumptions about format and character type (i.e., alpha or numeric). In reality, most MR Number formats won't be modeled after the SSN format.
Key Considerations
- Regardless of your path to the Patient Search screen —whether as illustrated above or you
- Click the Select button in patient demographics.
- Click the Select button in Add a Wait List Item or Add a Recall Item screens
- Click the Select a Patient icon in Find Appointment.
- Any adjustments you make to how the data is filtered, whether changing the focus or enabling a search option, are saved for the next search. The changes are retained until you modify the filters again.
- See the Advanced Patient Search Overview and Enabling the Advanced Patient Search topics to review alternate search workflows.
- See also, Data Search Review for additional information.
—the steps for completing a search are the same. Use the tools as they are outlined above.
Reordering Data Columns
Users can arrange the columns of data to fit their current need. As an example, use the Patient Search Dialog. Instead of having the Description column appear last, you can switch the columns so that it is the first column in the search dialog.
- Place the cursor over the header of the column you would like to move. It will change from a pointing finger to a cross with arrows pointing in the cardinal directions.
- Click the left mouse button and hold it down.
- Drag the column to either the left or right to position it as you want the data to appear in the select screen.
