Insurance Plan Information
Plan Information is the first tab of the patient insurance screens, and it provides the details of the selected insurance plan type. The screen appears when you choose an existing plan to edit on the patient Insurance tab or once you select the plan type when you add a new plan to the patient record.

- Complete the plan information according to the following definitions.
- Proceed to the Contact Information and Notes screen.
- Once you have finished the insurance data entry for the patient, click Save. The following message will appear:
- Click OK to copy the plan and make it available to the cases. Click Cancel to prevent the copy procedure.
- Click Save to commit all the changes to patient demographics.
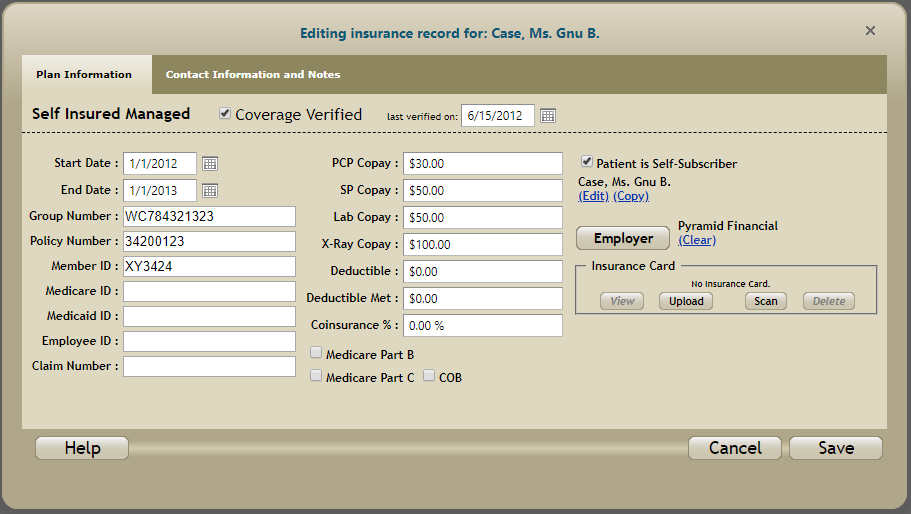
Coverage Verified: For organizations that use a manual insurance verification workflow, check the Coverage Verified check box when the patient's insurance coverage has been verified,
Last Verified On: For organizations that use a manual insurance verification workflow, enter the date on which the patient's insurance coverage was last verified.
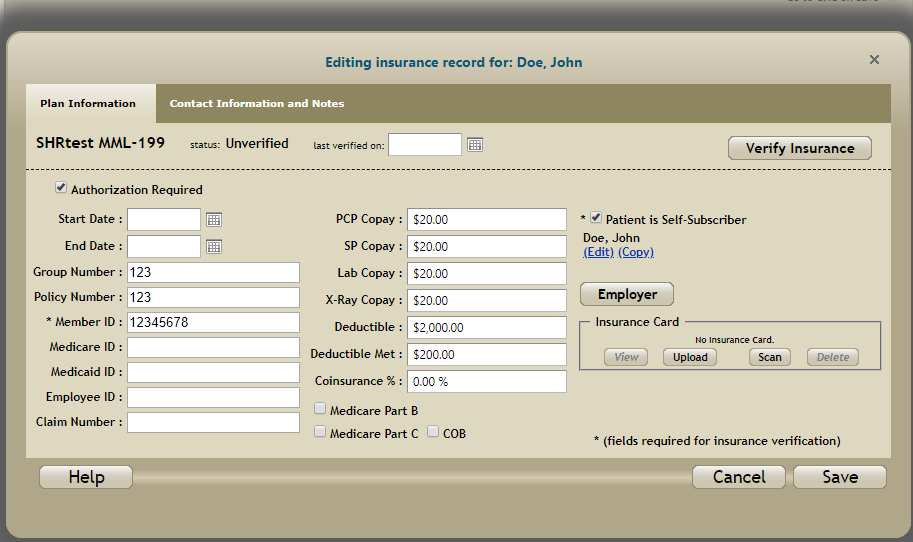
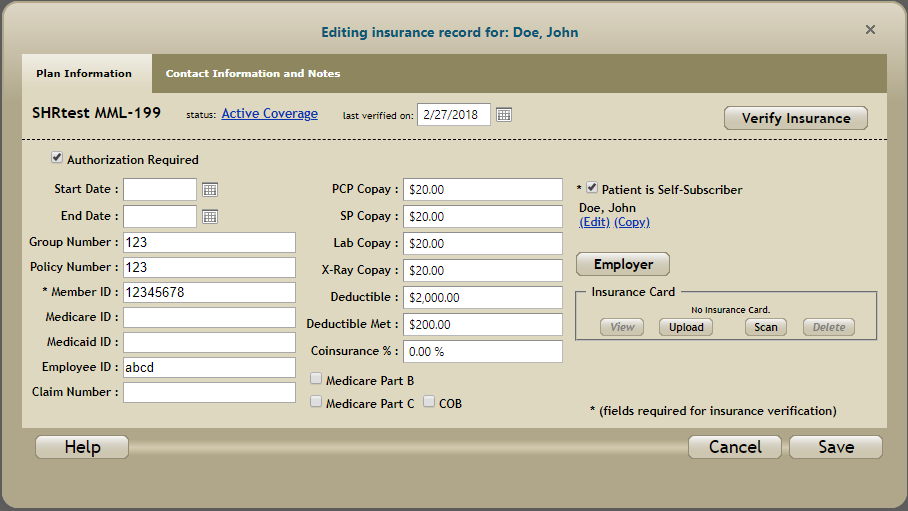
NOTE: For organizations that use real-time insurance verification, a Verify Insurance button displays near the upper-right portion of the Plan Information tab and a Status link displays instead of the Coverage Verified check box. The Last Verified On date and the Status value are automatically set when a real-time insurance verification is performed. See the Real-Time Insurance Verification section below for more information.
Start and End Dates: Simply enter the appropriate coverage dates for the current plan.
Group Number: Simply enter the insured's group number, as provided on their insurance card.
Policy Number: Enter the policy number as provided on the insured's card.
Subscriber: Click Subscriber to associate one with this plan. If the required Subscriber is not in the system, click New on the Subscriber Search screen. Complete the record according to the Help provided on the Edit Subscribers/Responsible Parties screen.
Relation: Click the drop-down and select the appropriate relationship of the subscriber to the patient, or in some cases (such as clients with integrated billing) you may select the relationship of the patient to the subscriber instead.
Employer: Click Employer to associate one with this plan. If the required Employer is not in the system, click New on the Employer Search screen. Complete the new record according to the Help provided on the Edit Employer screen.
Co-pays, Deductibles, IDS: These are fairly standard insurance fields. Simply enter information as appropriate to your workflow.
Insurance Card: See the Insurance Card topic.
Would you like to copy this plan to all active Cases?
Real-Time Insurance Verification
Organizations that have an account with Zirmed (a 3rd party clearinghouse) and who have configured their Waystar account information on the Data Maintenance > Integrations screen and the Data Maintenance > Insurance Maintenance > Insurance Plans screen can perform real-time electronic insurance verification.
See the Integrations help topic and the Adding/Editing Insurance Plans help topic for more information about configuring Waystar account information and enabling real-time insurance verification.

- Verify that the Member ID and Subscriber fields contain valid values.
- Click the Verify Insurance button. An Eligibility Response screen displays providing detailed coverage information.
- Click the Use This Report button at the bottom of the Eligibility Response screen to save the insurance coverage information and update the Status and Last Verified On date. (You have the option to click the Cancel button if you do not want to save the insurance coverage information.)
- Click the Save button on the Insurance Plan tab.
If real-time insurance verification has already been performed for the patient, the Status link displays the current status (for example, Active Coverage). Click the link to view the saved coverage information. Viewing the results of a prior insurance verification check in this manner will not generate additional data charges.
All insurance verification requests and views are recorded in the Audit Log and include the name of the user making the request (or viewing the insurance information), the patient name, and the date / time of the request (or view). The logged information is available in the Audit Log report.

