Cancel and No-show for Groups
When working with groups, users have the option to cancel (or mark no-show) the entire group or just a specific patient in the group. Use one of the workflows outlined in the following discussion.
From the Grid
To cancel group appointments from the grid:
- Locate the group appointment to cancel.
- Do one of the following to open the Cancel Appointments screen (or the No-Show Appointments screen).
- Right-click over an appointment. The options menu will appear. Select Status Actions > Cancel or Status Actions > No-show.
- Click the appointment once. The details will populate the scheduling palette. Click either the Cancel or No-show button in the appointment details panel.
- Complete the screen parameters according to the following descriptions/definitions.
- Choose to either:
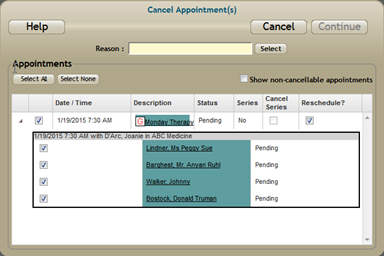
- Cancel/No-show the entire group—the default.
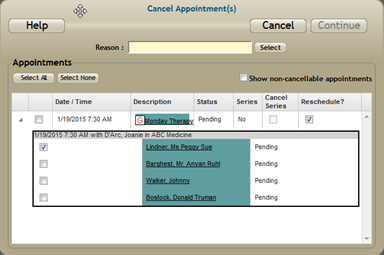
- Cancel/No-show specific members of the group: Click the checkbox next to the members whose status should not change to de-select their name. Alternatively, use the Select None/Select All buttons as needed click the member that should be canceled/no-showed.
- Click Continue to complete the cancellation. Click Cancel to abort the procedure. The appointment will be removed from the scheduling grid.
- Verify the status change by looking at the Check-in screen or by looking at the group Appointments tab in group demographics.

The above screen shot illustrates how the Cancel Appointment screen appears when the group member appointment has focus when Cancel/No-show is selected: that is, only Peggy Lindner is checked (enabled).

The above screen shot illustrates a cancellation when the group appointment has focus when Cancel is selected: that is, all of the members in the list panel are checked (enabled).
Regardless of how you navigate to the Cancel Appointments screen for a group appointment, the entire member list is expanded. This helps to clarify what your options are for managing the appointment in that you can immediately see what will happen when you complete the transaction. For example, de-select members that shouldn't be canceled, or select those that should be canceled.
Reason: Click the Select button in the Reason field and make the appropriate selection.
Select None/Select All: When canceling more than one appointment at a time, you can use these buttons to select or de-select all the appointment listed. Use them as appropriate to your situation. In group appointments you can use these to select or de-select all of the members so that you can quickly select the one you want to cancel or no-show.
Show Noncancellable Appointments: Select this option to list appointments that cannot be canceled or marked no-show because of your security profile. The option is disabled by default. Check this box to display the appointments that could potentially be canceled regardless of your security profile.
Series: If the appointment is part of a recurring series, the word Yes will appear in the Series column, and the Cancel Series checkbox will be enabled for selection. Simply check the option in the appropriate line item to cancel all of the patients future appointments in the series.
Reschedule: By default the program "flags" each appointment as available to be rescheduled. If the patient should not be rescheduled, click the option once to de-select it.
See also, Cancel and No-show
From the Check-in Screen
- Select Check In Screen from the Main menu.
- Change the date as needed. The default is today's date.
- Locate the appointment that requires a status change.
- Do one of the following:
- Click the drop-down in the group appointment line item of the Status column and select Cancel or No-show.
- Complete steps 3–5 above.
From the Group Appointments Tab
- Navigate to the group demographic screens, and select the appropriate patient.
- Click the Appointments tab.
- Use the filtering and grouping option to locate the appropriate appointment.
- Click the "operation" checkbox in the desired appointment line item.
- Click the drop-down in the Perform Operation field and choose Canceled or No-show according to your current need. The Cancel/No-show Appointments(s) screen will appear.
- Complete steps 3–5 in the "From the Grid" section.

Key Considerations
- When only individuals from a group are canceled and you allow rescheduling, the patient's appointment is severed from the group and becomes an individual patient appointment.
- Canceled information is stored in the patient history for statistical reporting, so do not delete appointments if they are really a cancellation or a no-show. To ensure accuracy of the data the reports provide, Delete should only be used for scheduling mistakes.
- When an appointment is deleted, canceled, or marked no-show, the financial information for that appointment is not removed from the system.
- Appointments with payments attached can be canceled, marked no-show, or deleted.
- If an appointment has financial information attached to it and it is subsequently canceled, marked no-show, or deleted, users must go to the patient’s Financials tab to delete the payments where applicable.
