Cancel and No-show on the Appointments Tab
Tracking cancellations and no-shows helps to illustrate the patients who have a history of missing appointments, the resources who have more missed appointments, and the proportion of the schedule that is composed of cancellations and no-shows. Used in combination with a reminder and confirmation system, a good cancellation workflow helps to identify areas that need improvement.
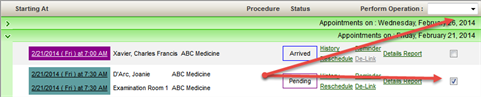
To cancel or no-show an appointment directly from the Appointments tab:
- Navigate to the patient demographic screens, and select the appropriate patient.
- Click the Appointments tab.
- Use the filtering and grouping option to locate the appropriate appointment.
- Click the "operation" checkbox in the desired appointment line item.
- Click the drop-down in the Perform Operation field and choose Canceled or No-show depending on your current need.
- Click the Send Notification Text check box if you want to send a text notification to the patient alerting them of the cancellation. Otherwise leave the checkbox deselected.
- Complete the screen parameters according to the following descriptions/definitions.
- Once you have completed the options, click Continue. The Appointments tab will refresh with the selected reason.

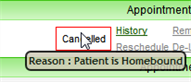
The Cancel Appointment(s)/No-show Appointment(s) screen will appear.
Reason: Click the Select button in the Reason field and make the appropriate selection.
Select None/Select All: When canceling more than one appointment at a time, you can use these buttons to select or de-select all the appointment listed. Use them as appropriate to your situation.
Show noncancellable Appointments: Select this option to list appointments that cannot be canceled or marked no-show because of your security profile. The option is disabled by default. Check this box to display the appointments that could potentially be canceled regardless of your security profile.
Series: If the appointment is part of a recurring series, the word Yes will appear in the Series column, and the Cancel Series checkbox will be enabled for selection. Simply check the option in the appropriate line item to cancel all of the patients future appointments in the series.
Reschedule: By default the program "flags" each appointment as available to be rescheduled. If the patient should not be rescheduled, click the option once to de-select it.

If necessary, select multiple appointments and cancel or no-show them in one operation, as long as the same reason is required for each.
If you hover your cursor over a status that requires a reason, the reason used will appear in a tooltip.
See also, Cancel and No-show
Key Considerations
- Canceled information is stored in the patient history for statistical reporting, so do not delete appointments if they are really a cancellation or a no-show. To ensure accuracy of the data the reports provide, Delete should only be used for scheduling mistakes.
- When an appointment is deleted, canceled, or marked no-show, the financial information for that appointment is not removed from the system.
- Appointments with payments attached can be canceled, marked no-show, or deleted.
- If an appointment has financial information attached to it and it is subsequently canceled, marked no-show, or deleted, users must go to the patient’s Financials tab to delete the payments where applicable.
