Pinning a Resource to the Grid
Pinning a resource to the grid is a management feature that allows you to dynamically arrange scheduling columns to fit your current workflow. In effect, a pinned resource is anchored in a column to the left-most portion of the grid, and it remains visible as you scroll right on the current page or navigate between scheduling pages (or tabs). In that the placement of the column persists, you can keep the resource in context in order to (a) visually compare that resource's schedule with the schedules of other resources or patients on the grid and (b) make the best possible determination of time and availability.
To pin a resource,
- Do any of the following:
- Right-click over the column head of a resource who has already been placed into a column and then select Pin [Last Name, First Name] To The Grid from the menu. The grid will refresh with the selected resource placed in the left-most column.
- Click the Pin a Resource to the Grid button in the lower left grid corner to open the Resource Search screen.
- Navigate to any other page on the grid to compare the pinned column with the resource or patient schedules placed there.
- Repeat as necessary to pin additional resources.
-
Alternatively, you may want to pin some specific resource and a patient to compare with other schedules throughout the organization.

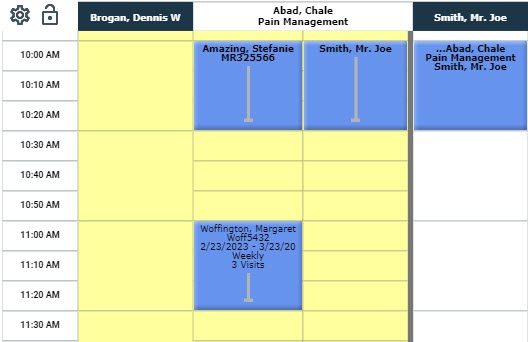
The previous screen shot illustrates a pinned resource (Abad) and a pinned patient (Brogan).

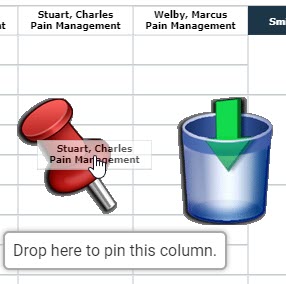
Either choose the appropriate resource and click Select, or double-click the Resource Description. Alternatively, click-and-hold the mouse on an already existing column header for the resource you wish to pin. Drag the column header to the grid until you see the Pin and Clear icons. Drop the header on the Pin icon.

Pinning Multiple Columns
The program allows you to pin up to 20 resources or patients to a column. Practicality and usefulness, however, should probably limit you to only a handful of pinned columns at a time. Each subsequent patient/resource that you pin is placed on the grid to the right of the previous pinned column—so in the example above, Brogan was pinned prior to Abad.
- The horizontal screen resolution of your monitor and the width of your column settings will both affect the practical limit on the number of column you pin.
Key Considerations
- Pinning a patient or resource is governed by the Can Change Grid Columns global right.
- Pinned columns do not apply to the Weekly or Monthly views. They persist only as you navigate in the Daily View.
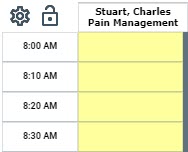
- Note that in a pinned column, the time slots or cells appear in yellow with a bold blue vertical rule separating the pinned column from the rest of the grid.
- Schedule in the pinned column as you would a normal resource column.
- The primary benefit of the pinned resource is that you do not have to place the same resource in a column on every page that you may flip to in order to compare their schedule with other resource or patient schedules. You simply pin them and flip through the scheduling pages as needed.

See also, the Pinning a Patient to the Grid and Flex Tab topics.
