Flex Page
The Flex page is used to gather the schedules of selected patients and resources into a single location so that users can work with them more efficiently. Any resource or patient currently assigned to a column can be "grabbed" from their current page assignment, regardless of the page the column might be on, and then placed on the Flex page. Once the columns have been placed, users can compare the collected schedules for availability and then schedule appointments as appropriate.

As illustrated, the Flex page is the last page of any scheduling tab and is colored a shade of violet.
Navigate to the Flex page simply by clicking the page tab once to select it. As with clicking any other page tab, the grid will refresh to show the patient and resource columns assigned to it. If none have been assigned, the page will be blank.
- Right-click the Flex page to clear the columns. A pop-up confirmation will appear. Click OK to continue. Click Cancel to abort the clear.
- Click the Flex page and press the Spacebar on the keyboard to clear the page without the confirmation.

To add resources or patients to the Flex page, do the following:
- Navigate to the first page that has resources or patients whom you want to capture.
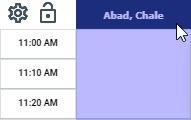
- Press and hold the Shift key down and then click the column header of the first resource or patient. The column will turn light green.
- Repeat step 2 until all the patients and resources that are required from the current page have been selected.
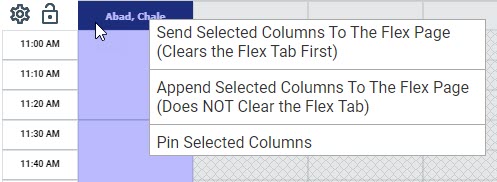
- Right-click over any of the selected columns to display the following pop-up menu.
- Click the Send Selected Columns to the Flex Page option. As you can see in the message illustrated above, this will clear the Flex page of any previously assigned columns.
- If necessary, navigate to another page or tab set to select additional patients and resources.
- Repeat steps 1–6 as necessary, or until you have reached the maximum number of column assignments.
- Click the Flex page to view or compare the selected patient and resource schedules.


Alternatively, click the Append Selected Columns to the Flex Page option to simply add your selection to the existing columns on the Flex page.

For example, the current tab set for the example above is Iron Mountain Physical Therapy. Click the tab set description to select an alternative. Or you could click the ABC Sports Medicine page tab to select resources assigned to that page.
Saving a Flex Page Configuration
You can preserve the contents of the Flex page for use in the future:
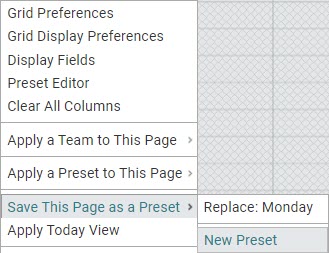
- Click the Presets and Preferences icon above the Time Column and select Save This Page as a Preset > New Preset from the pop-out menu.
- Enter a description in the New Preset Name screen and then click OK.
- Then apply a saved preset:
- Click the Flex page to give it focus (or any page that you would like to use for that matter).
- Click the Preset and Preferences icon.
- Select Apply a Preset to this Page > Flex Page [or whatever your preset description is]. The grid will refresh to reflect the column configuration associated with the preset.

Key Considerations
- The Flex page is a temporary grouping of patient and resource columns so that users can compare schedules. The columns are automatically cleared on program exit.
- The scheduling functions of the Flex page are exactly those of the regular grid. Just keep in mind that the column assignment is temporary.
- When adding resources from multiple pages, be sure to add the selected resources on any given page before navigating to another page. Then choose Append Selected Columns to the Flex Page for additional resources on subsequent pages.
