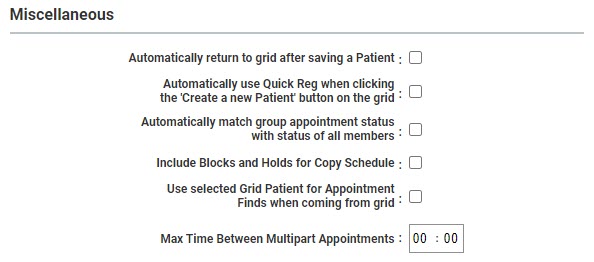
Miscellaneous Preferences

Automatically Return to the Grid after Saving a Patient
By enabling this option, each time a patient record is saved the program will automatically return to the scheduling grid with the patient's information populated in the Demographics panel. When this option is disabled, users have to select Scheduling > Grid from the Main menu and then select the patient that was just edited.
For example, Joe Jackson calls in for an appointment, and while verifying his address you find that some information has changed. Edit and save his new information—the program will return to grid.
Automatically use Quick-Reg when Clicking the "Create a New Patient" Button on the Grid
Enable this option so that when the current user clicks the "New Patient" icon in the demographics panel, the Quick-Reg workflow will be launched rather than the default patient registration workflow.
Automatically match group appointment status with status of all members
Enable this option to have group appointments automatically update to the same status as the individual members when the individual members share the same status. For example, when a group of 3 patients all have individually confirmed their appointments, the program will "silently" update the group appointment to Confirmed as well. Likewise, as soon as all the individuals have been marked Arrived, the group status will be updated to Arrived, and so on. If this option is not enabled, the program will pop up a message similar to the following:

Click OK to continue, Cancel to abort the change to the group appointment.
Include Blocks and Holds for Copy Schedule
One of the options on the right-click menu for resource columns is the ability of users to copy a resource's schedule for any given day: Copy Schedule. The preference here controls whether the feature should include block and hold times in the copy procedure. They are excluded by default in that it is more efficient to manage these elements in templates over the long-term. Controlling blocks and holds with templates promotes consistent scheduling for the resources, requires fewer scheduling conflicts to manage, and is less burdensome on the server's performance. If, however, your scheduling workflow requires all scheduled items, click this option once to enable it.
Use Selected Grid Patient for Appointment Finds When Coming from Grid
When this option is enabled and a patient is currently selected on the scheduling grid, the same patient will automatically be selected when you navigate from the scheduling grid to Find Appointment, Appointment Type (Procedure) Find, or Treatment Protocol Find. When this option is disabled, you will have to manually select a patient on the Find Appointment, Appointment Type Find, or Treatment Protocol Find screens.
Max Time Between Multi-Part Appointments
Enter the maximum number of hours and minutes allowed between appointments when searching for multi-part appointments on the Appointment Type Find screen. For best results when setting the default value, use intervals that match the scheduling intervals for the domains you will be searching in (e.g. 15, 30, or 60 minute intervals). The specified maximum will auto-populate the Max Time Between Appointments text box on the Appointment Type (Procedure) Find screen. When more than one Appointment Type is selected in the Appointment Type drop-down list and the Max Time Between Appointment is specified then non-back-to-back appointments will be included in the search results provided they do not exceed the specified maximum. You will be allowed to override the maximum on the Appointment Type Find screen.
