Photographs in Patient Demographic Records
Attach a photo quickly and easily to any patient demographic record by either (a) selecting and uploading an existing file or (b) scanning an image directly into the program. Once attached, the photo will appear in the (a) patient picture panel of the Demographics tab and (b) in the Patient Demographics panel when the patient is selected.
Adding an Existing File
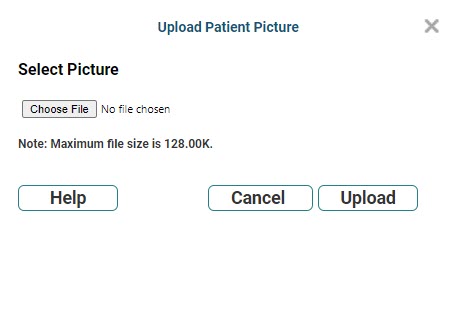
- Click the Add link next to the "No picture assigned." line in the Personal Information panel. The Upload Patient Picture screen will appear.
- Click Choose File to navigate to and select the desired picture. The Upload Patient Picture screen will refresh with the selected file.
- Click Upload.
- Verify that the correct picture is displayed. If it is not, click Change and select the appropriate photograph.
- Click Save on the patient demographic screens to complete the patient record.

Note that the image size is limited to 128K.
The next time that the patient is selected for editing, the picture will appear with the options Change and Remove next to it.
Scanning in a Patient Picture
- Click the Scan link next to the "This Patient has no picture assigned" in the Personal Information panel. The Acquire Image screen will appear.
- Complete the parameters according to the following:
- Click the Acquire button in the Acquire Image screen. Your normal TWAIN interface for operating your scanner will appear. (This is the software that was installed with the scanner and will be unique to the device you are using.)
- Set the scanning parameters and then scan the file as you would normally.
- Click Upload. A progress bar will appear. Once complete, the scanned image will appear in the category you selected.
- Continue with your patient registration or update and then save the patient once you have finished.
Twain Source: Accept the default source or click the drop-down and choose an alternative if you have more than one scanner. Make sure the scanner is turned on.
Zoom: Click the drop-down menu and set to your desired setting.
A Scanning progress screen will appear during scanning. Once the scan is complete, the image should appear in the Preview panel of the Acquire Image screen.
Note Regarding the Scanner Interface
As you work with your scanner, you may run into a situation in which the TWAIN interface (i.e., the software that drives your scanner) opens in a browser tab behind the tab in which the scheduler is loaded. Because of the nature of how some browsers work on some machines, we have no control over this. The solution is to simply Alt + Tab to select your TWAIN interface.
- Hold the Alt key down on the keyboard.
- While holding down the Alt key, press the Tab key. A pop-up window will appear that shows the programs that are currently open—represented by their icons. The first icon will be the open program that is front most on the monitor (i.e., the one you see). The icon will be outlined, or selected.
- Continue to Alt + Tab until the scanner interface is selected.
- Release the keys. The scanner interface should now be visible.
Modifying the Patient Picture
To change an existing patient picture, click the Change button to upload an alternative file, or click Scan to capture and upload a replacement file.
