Grid Display Preferences
You can alter the grid display preferences to achieve a cell display and grid configuration that best meets your needs. Different preferences can be applied to each grid view (e.g., daily, weekly, monthly, etc.).
Follow the steps below to change your grid display preferences.
- Do either of the following to open Preferences:
- Click the Presets
and Preferences
 icon at the top of the Time column on the scheduling
grid then select Grid Display Preferences from the drop-down menu, or
 - Click the Preferences link at the top right of the main screen to open the User Preferences screen then select Grid Display Preferences from the menu options on the left.
- Update the appearance of text that displays on the grid in addition to the height and width of grid columns and cells as described below.
- Font — Click the Font drop-down and select an alternate Font.
- Size — Use the Up and Down arrows to adjust the font size.
- Font Style Check Boxes — Enable or disable the following font styles:
- Bold
- Italic
- Shadowed
- Default — Click the Default link to revert back to the default font settings.
- Daily
- Weekly
- Monthly
- Resource Daily
- Patient
- Column Width
- Column Height
- Time Cell Width (row)
- Time Cell Height (row)
- High Detail Block and Hold Cells: The default is enabled. Disable the check box to reduce the number of drawing operations on the grid and increase performance of low-end systems. When disabled, the highlighted bevels on the grid are removed and the appointments will look flat.
- High Detail Appointment Cells: Works exactly the same as the High Detail Block and Hold Cells check box.
- Click Save to save the settings or Revert to abandon any unsaved changes.
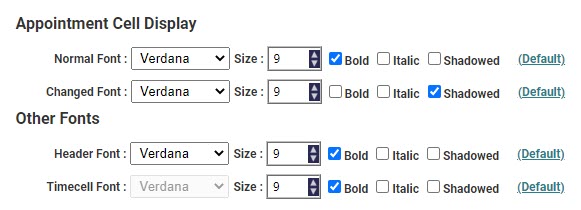
Appointment Cell Display — The first panel controls the appearance of appointment text that displays in the grid cells. You may change the font settings for both normal appointment text and recently changed appointment text.

Normal Font: Change any of the following font settings. The default font for normal text is Verdana, 9 point, Bold.
Changed Font: Change the font settings as needed in the same manner described for Normal Font. The default font for changed text is Verdana, 9 point, Shadowed.
Other Fonts — The Other Fonts section allows you to change the font for column headers and row (time cell) headers. The default font for both is Verdana, 9 point, Bold.
Header Font: Change the font settings as needed in the same manner described for Normal Font.
Time Cell Font: Change the font settings as needed in the same manner described for Normal Font.
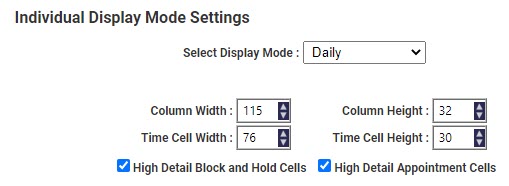
Individual Display Mode Settings — The second panel controls which display mode your changes are applied to (daily, weekly, etc.), the column and time cell width and height, and the amount of graphic details used when rendering the grid appointments.

Select Display Mode: Click the drop-down then choose one of the following options.
Column and Cell Width and Height: Use the spinner controls to increase or decrease the following values.
Graphic Detail Check Boxes: The scheduling grid uses several layers of alpha shading and transparency effects when the appointment cells are rendered. These are controlled by the following check boxes.
