Deleting Appointments
The intended purpose of Delete is to remove scheduling mistakes. Because of this, deleted appointments are not reported on in the same manner as canceled and no-show appointments. Although, the program can include deleted appointments on many reports, the Appointments tab, and in Appointment History, it is often only by choice. Users should delete only those appointments that were scheduled in error. Otherwise, cancel or mark them as no-show accordingly. The practice management reports that WellSky Resource Manager provides will not accurately reflect patient and user scheduling habits if you delete appointments when they should be canceled (marked no-show) or if you cancel appointments that should be deleted.
Deleting Appointments on the Grid
- Locate the appointment to delete.
- Right-click the appointment then click the Delete link on the Scheduling Palette to open the Delete Appointment confirmation screen.
- Click Delete to continue, Cancel to abort the operation.
After a moment the appointment will be removed from the scheduling grid and the appropriate update will be made to the patient’s record.
Confirmation Screens on Delete
Depending on the type of appointment to be deleted, two additional confirmation screens may appear when you delete an appointment:
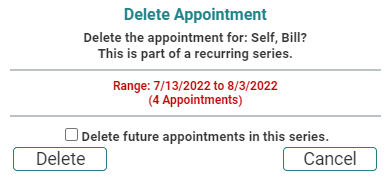
- Appointment Series Warning: If the appointment is part of a recurring series, the following confirmation will appear:
- Click the checkbox to delete all or part of the series and then click the Delete button.
- Click just the Delete button to remove only the selected appointment.
- Click the Cancel button to abort the operation entirely.
- Multisegment Warning: If the appointment is composed of multiple segments, the following confirmation will appear:
- Click Delete to remove the entire appointment.
- Click Cancel to abort the process so you can de-link the appropriate segment and then delete it.


Key Considerations
- In order to delete an appointment, the user must have Delete appointment rights.
- Click and hold the appointment and press the Delete key on the keyboard as an alternative to the palette.
- When an appointment is deleted, the financial information for that appointment is not removed from the system.
- Appointments with payments attached can be deleted. If an appointment has financial information attached to it and it is subsequently deleted, you must go to the patient's Financials tab to delete the payments where applicable.
