Adding/Editing Reasons
When a block time or a hold time is created, when a patient appointment is canceled or marked as a no-show, or when a patient is discharged, the program requires a reason. These are then recorded in the appropriate table or patient record or are used to mark schedules on the grid. In addition, the cancellation and no-show reasons are tracked and used in the statistical reporting. With careful use, for example, patterns for cancellations and no-shows will begin to emerge and you can adjust your scheduling practices accordingly. Though all the reasons will tend to develop or evolve over time, it is important to begin using the scheduler with an initial set of standard reasons to avoid slowing the scheduling process and to ensure some consistency in scheduling from the outset.
To define a reason,
- Select Data Maintenance > Reason Maintenance from the Main menu. The Edit Reasons screen will appear.
- Complete the parameters of the reason according to the following definitions.
- Block
- Hold
- Discharge
- Cancel/No-show
- Discontinue Order
- Recall
- Referral Discontinue
- Auth Close Reason
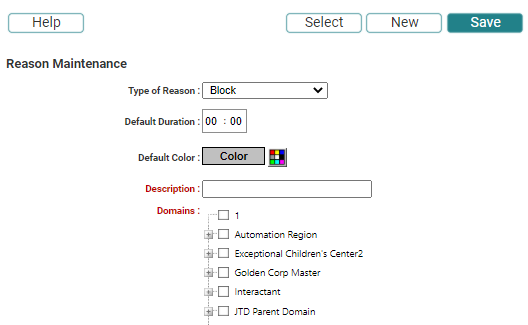
Type of Reason: Click the drop-down and select from the following options:
Description: Enter a description up to 50 characters in length. This field is required.
Domain: Select the domains with which to associate the reason. This field is required where applicable.
Block/Hold Time
Block and Hold Time reasons include the following additional parameters in their definitions.

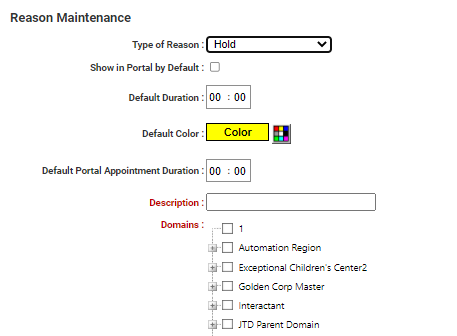
Default Duration: Configure the default duration for the block or hold as needed. Enter time in hh:mm format.
When a reason is used to schedule a block or hold time, the duration is automatically set to the default configured here: That is, users don't have to set the time during the scheduling process unless they need to edit the default for some reason. If the duration is left blank, then the duration will be whatever the user selected on the grid or sets on the block/hold time creation screen.
Default Color: Block and hold times have always had a default system color for all block times and all hold times scheduled. With the 2015 release, however, color can be configured for individual block and hold reasons, which allows you to differentiate between types of blocks and holds and saves you a step during the scheduling process.
Click the color picker (cube) and choose a color from the palette or the 16 custom colors that may have been defined for your organization. If you do not set a default color at the individual block/hold reason definition, then when one is scheduled, it will simply use the system default.
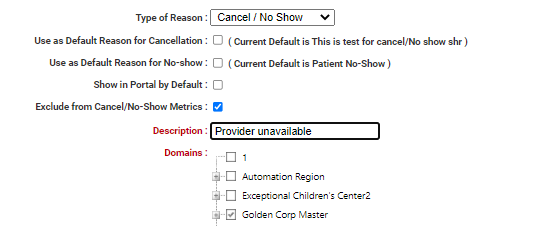
- Use as Default for Cancellation
- Use as Default for No-show
- Show in Portal by Default
- Exclude from Cancel/No-show Metrics - if the reason for a cancellation or no-show is something that is out of the patient's control, then select this option to exclude a cancellation or no-show that is assigned this reason from the patient and resource cancellation/no-show metrics.
- The same reason can be assigned to both Cancel and No-show, or you can create separate default reasons for each one. The default does not restrict using other reasons. Rather, it simply makes the data entry more efficient for those who don’t require multiple options.
- These options require that the Global User Right “System Preferences” be set to Full. Otherwise, the user will simply see the current value that has been selected, if any.
- Users can always change the portal configuration on the fly—this option simply sets the default visibility.
- If you do not want patients to be able to cancel their own appointments, then do not create any cancellation reasons with this option checked.
- 8:00 a.m. to 8:30 a.m.
- 8:30 a.m. to 9:00 a.m.
- 9:00 a.m. to 9:30 a.m.
- 9:30 a.m. to 10:00 a.m.
- For example, consider someone who schedules an appointment that begins at 9:15 and continues to 9:45 a.m. (and all else being equal), portal users will see an appointment options for only the 8:00 a.m. and 8:30 a.m. starting times. The default 30 minutes cannot be met in either the 9:00 or 9:30 a.m. start times.
Cancel/No-show
Cancel/No-show reasons include the following additional options that administrative users will want to consider when they implement the system in their organization:

Enabling either of these options creates a straightforward default for whichever action you assign the reason to. So that when you mark a patient No-show, for example, you don’t have to choose a reason. The correct one will populate the Reason field automatically.
Patient Portal
If your organization has also purchased the Patient Portal, some additional configuration must be considered regarding Cancellation and Hold reasons. Both share the "Show in Portal by Default" option—see the previous screen shot for illustration.
Show in Portal by Default: This option is disabled by default. However, if you want the reason to be available automatically for use in the Patient Portal, click the checkbox to enable it. This will ensure that the hold or cancellation reason will be available to portal users. For example, when a portal user cancels his or her appointment, this reason will be available as an option, or when you schedule a hold time with a reason that has this option enabled, that hold will be visible to portal users by default.
Default Portal Appointment Duration: In addition to the "show" option, hold times have a duration option that pertains specifically to the Patient Portal.

The duration option sets the appointment length for the given hold time when it is used in the Patient Portal. For example, you could make a single hold time for New Patients for two hours on the grid starting at 8:00 a.m. If the default duration for the Portal is set to 30 minutes, however, portal users will see four separate checkbox options (if all of the hold is open) for New Patient appointments on any given day the hold is used:
Without the default, users would see only a single hold time starting at 8:00 a.m. Or, if someone had already scheduled an appointment for part of the total hold time, subsequent portal users would see start and end times that cover the balance of the remaining hold time. When a default duration is configured as part of the hold reason, the Portal will show only appointment possibilities in which the default duration can be met.
Key Considerations
- Reason data entry is governed by the Global User Right “Edit Reasons.”
- Hold times that are shown in the Patient Portal will display a P in the lower-right corner of the last cell of the appointment, illustrated in the following example.

- Administrators in each domain may create block, hold, cancellation, and discharge reasons specific to his or her own need. However, some effort should be given to coordinate reasons that might be common to all domains and to ensure that those reasons are assigned to the highest level domains. This will avoid unneeded duplication.
- Once a reason is used, it cannot be deleted; therefore, care should be given as to who has the right to create reasons. A message similar to the following will appear if you try:
This reason is used as the default reason for Cancel/No-show operations and cannot be deleted.
Click OK to continue.
