Confirming Appointments
The Confirmed feature is an informational statistic indicating whether you have contacted the patient to verify appointment attendance. The feature also allows you to attach notes documenting relevant information regarding the patient’s status. Use confirmation as the final verification for the reminder system of your choice (e.g., letter, phone, e-mail) or as an internal verification of the patient’s acknowledgment of the appointment. The various workflows for setting confirmation is discussed below.
Scheduling Grid
Follow the steps below to confirm an appointment from the Scheduling Grid.
- Select Scheduling > Grid from the Main menu to navigate to the grid.
- Select the appropriate date from the Navigation Calendar, and make sure the appropriate resource is in a column.
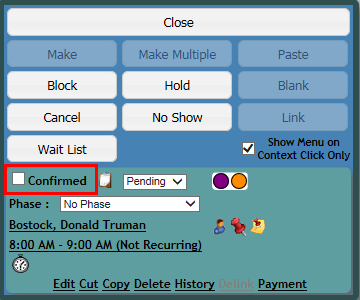
- Right click the appropriate appointment to display the Scheduling Palette.
- Click the Confirmed checkbox in the appointment detail panel.
- If you need to add a comment regarding the appointment status, click the clipboard icon to open the Appointment Status Notes screen.
- Enter a comment in the New Entry panel then click the Accept button to return the grid.

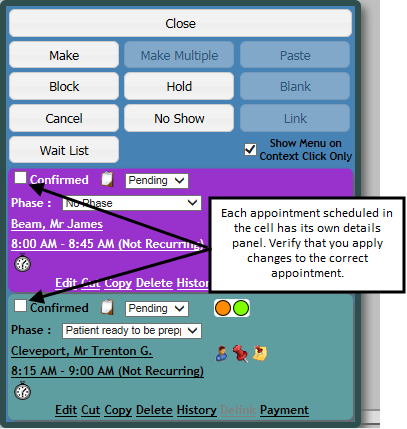
Double-booked Appointments
Use the same steps as above making sure to choose the correct appointment details panel when applying the confirmation.

Check-in screen
Follow the steps below to confirm an appointment from the Check-in screen.
- Select Check-in from the Main menu.
- Use the Navigation Calendar to select the appointment date.
- Locate the appropriate appointment line item and click the Confirmed checkbox in the Status column.
- If you need to add a comment regarding the appointment status, click the clipboard icon to open the Appointment Status Notes screen.
- Enter a comment in the New Entry panel then click Accept to return to the Check-in screen.
- Repeat as necessary for additional appointments.
Key Considerations
- Appointment Operations must be set to at least Read-only and user must have Change Appointment Status set to Full in their security profile in order to confirm or add status notes to appointments.
- Confirmed appointments display a check mark in the lower right-hand corner of the first cell of the appointment, and the check box in the Confirm column on the Check-in screen.
- Text lines are added to the Clipboard icon as a visual indicator that status notes have been added to an appointment. Compare the following two screen shots.
Appointment  versus the Check-in screen
Without status notes ![]() versus with status notes
versus with status notes ![]()
- Once saved, status notes cannot be edited. Make sure the text you enter is correct before clicking Accept.
Confirming a Group Member's Appointment
Scheduling Grid
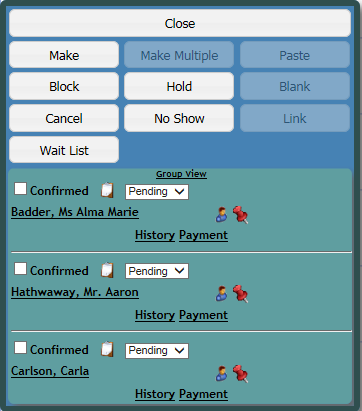
When you confirm a group appointment from the scheduling grid, the members who compose the group will be marked confirmed on the Check-in screen automatically. Follow the steps below to confirm a group appointment or an individual group member from the scheduling grid.
- Right click the appropriate group appointment to open the Scheduling Palette.
- Do either of the following.
- Click the Confirmed checkbox to confirm the group.
- Click the Switch to Member View icon next to the group description to display each group member then click the Confirmed checkbox for each member you wish to confirm.
- If you need to enter a comment regarding the appointment status, click the clipboard icon next to either the group or member as appropriate to open the Appointment Status Notes screen.
- Enter a comment in the New Entry panel then click Accept to return to the grid.
![]()

Check-in Screen
Follow the steps below to confirm a group member's appointment from the Check-in screen.
- Select Check-in from the Main menu.
- Locate the group appointment (indicated by the letter G) and click the right-facing arrow in the group appointment line item to expand the details (a list of all patients in the group).
- Do either of the following.
- Click the Confirm checkbox in the group line item to confirm all members at once.
- Click the appointment time to display the group member information then click the Confirm checkbox next to the appropriate member line item.
- If you need to add a comment regarding the appointment status, click the clipboard icon next to either the group or member as appropriate to display the Appointment Status Notes screen.
- Enter a comment in the New Entry panel then click Accept to return to the Check-in screen.
