Batch Move
The Batch Move utility allows users with the appropriate security to move all or part of a resource's schedule to another resource by Time and Date range parameters. Use it, for example, to move appointments for a resource who has called in sick (or is otherwise indisposed) to another resource. Alternatively, Batch Move will allow you to move an entire resource's schedule to one or more other resources in the event a resource goes on vacation or leaves your practice.
To begin:
- Select Scheduling > Batch Move from the Main menu. The Batch Move screen will appear.
- Complete the options on this screen according to the following descriptions and definitions:
- Begin typing the resource's last name. The resources whose description most closely matches what you type will appear in a drop-down list. Use the arrow keys to highlight the resource and then press the Enter key, or click, the description once to select the desired resource.
- Click the field a second time to display a drop-down of all the resources in your organization and select the resource from the list. Note, resources are listed alphabetically and are not sorted by resource type.
- Click the Search link to display the Resource Search dialog to locate and select the resource.
- Once all of the move parameters have been completed, click the Perform Move button. The program will perform standard conflict checking. If any appointments cannot be moved for one reason or other, a message screen will appear to indicate the problems. Examples might include conflicts with a resources Exclusion/Inclusion list: that is, the Destination Resource's profile may exclude the procedures assigned to one or more of the Source Resource's appointments. Otherwise, the appointments will simply be moved.
- Click OK to continue.
- Repeat steps 2–4 as necessary (e.g., if you are moving the Source Resource's appointments to two or more other resources).
Source Resource: Click the Source Resource field to activate it. As example, review the following illustrations which show an inactive and active state.


Do one of the following to select a resource:
Destination Resource: Repeat the steps outlined for the Source Resource to select a Destination Resource.
Domains: Once the Source and Destination Resources have been selected, the domains in which Source works will be displayed in a checkbox list below the resource fields. The domains in which both resources work will be enabled. Those that the Destination Resource does not work in, will be disabled. (Note that the checkboxes in the enabled domains have a three-dimensional display whereas disabled checkboxes are flat.) Select any combination of shared domains that meets your current need. Once the move is performed, those patients scheduled in the selected domains will be moved from the Source Resource to the Destination Resource.

Date Range: The Start and End dates of the date range default to Today's date. Change these as necessary to include all of the appointments you wish to move. Click the field once to select it and then type the date or click the Calendar button and select the date visually.
Time Range: The date parameters default to 12:00 a.m. and 11:55 p.m. respectively (i.e., the entire day). Modify this time range as necessary. For example, you may want to split the absent resource's schedule between two or more resources, for whatever reason.
Optional Patient Filter: In general, the Batch Move utility moves all the patients that have been scheduled for the Source Resource for the given date and time to the Destination Resource. That is, a patient filter isn't applied. If, however, your desire is to move one or more specific patients from one resource to the other, you can choose those patients using the Optional Patient Filter. If any one patient is selected, then only those patients that are checked will be moved. That is, when you perform the move all the patients will be moved or only those that are specifically checked will be moved.
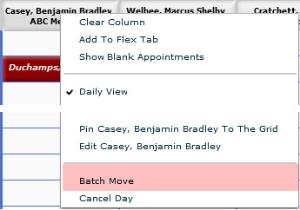
As an alternative to the Scheduling menu option, users can initiate the move process by right-clicking on the column header of the Source Resource and selecting Batch Move from the pop-up menu (of course the resource must be placed in a column first).

The Batch Move screen will appear as above, but the description for the resource on whose column header you clicked will populate the Source Resource field automatically. Complete steps 2–5 as outlined above.
Key Considerations
- Batch Move is governed by the "Move/Reschedule Appointment" security operation
- Users can move appointments between resources (a) of the same or different type and (b) who belong to the same domain (where domain is applicable).
- In order to have or use the utility at all, you must (a) have an Enterprise version of the scheduler or (b) have Inpatient Scheduling turned on in your version.
