Appointments Tab
The Appointments tab in patient demographics provides a view and management functions of all the appointments for an individual patient. To use the screen,
- Do either of the following:
- Navigate to patient demographics and select the desired patient. Click the Appointments tab once the patient has been selected.
- If the desired patient is currently in context on the grid, click the View Appointments icon in the Demographics panel.
- Use the descriptions and instructions in the following discussion to navigate the screen and manage a patient's appointments.
- Important! Once you make your filter or management selections, click the Apply button to update the screen. You must complete this step to apply the filter criteria and the appointment management actions.
In either case the Appointments tab for the selected patient will appear.
Filter and Sorting Features
The primary tools for navigating and managing appointments appear along the top of the Appointments screen. Below these, you will see a table list of the patient's appointments.
The previous screen illustrates the controls and basic layout of an appointment. The appointments are listed in reverse chronological order by default, but you customize the view to fit you workflow as you see fit.
Group Display Mode
This filter determines how the appointments are grouped in the screen.
- Date: The default grouping is by the date of the appointments in reverse chronological order. Click the drop-down to choose an alternative.
- Resource: Select this option if you would like to group the appointments by the resource with whom they were scheduled. Keep in mind that you organization uses multisegment appointments (perhaps you schedule a provider with a room for example; or a therapist and a piece of equipment) the appointment will appear under each resource heading.
- Account/Case: If your organization uses multiple accounts/cases (e.g., one for an auto injury versus one for a general health ailment) and you would like to separate the appointments for each, select this option.
- Domain: Finally, you can group the appointments by the domain in which they were scheduled. A group for each domain in which the patient has an appointment will be listed.
In each group, appointments are listed in reverse chronological order.
Filter Options
- All Appointments: By default, all of the patient's appointments are included in the list. Click the drop-down to choose an alternative .
- Past Appointments: Choose this option to include only those appointments that occur today and in the past in the list.
- Future Appointments: Choose this option to list only future appointments in the list.
Account/Case Options
- All Accounts/Cases: View the appointments for all of the accounts/cases that have been created for the patient—the default view.
- All Active Accounts/Cases: View only those appointments for the active accounts/cases (i.e., the case has not been discharged).
- Account/Case x: Select an individual account or case (Case a … Case n) to view only the appointments associated with it.
Deleted Appointments
Click the Include Deleted Appointments option once to include deleted appointments in the list.
Toggling Column Order
Click either the Starting At or the Status header at the top of the data columns to toggle the order in the list of appointments. The manner in which the data is ordered will depend on the Group Display Mode.
Date Mode: To change the default date order from reverse chronological to chronological,
- Click Starting At once.
- Click the column header again to switch to descending order by date. The triangle will switch to a downward facing arrow.
- Click the column a third time to change the order of appointments within each date.
- Click the header a final time to return to the default sort order. Note that the triangle disappears.
- Account/Case Mode: Repeat the steps outlined for Date Mode. The only difference is that appointments are grouped by account/case and then sorted by date within each case.
- Resource Mode: Repeat the steps outlined for Date Mode. The only difference is that appointments are grouped by resource and then sorted by date within each resource group—similar to the Date Order, but for each resource.
- Domain Mode: Repeat the steps outlined for Date Mode. The only difference is that appointments are grouped by domain and then sorted by date within each domain.
An upward facing arrow will appears next to the heading (see screen shot).
Sort the data in a similar manner using the Status column. Click the column header to sort all of the data or all the data in each subgroup by status. Pending being the lowest, Seen the highest.
Use the filter and sorting features discussed in this section to refine (limit) the display on your screen and provide a view to help you manage your appointments more efficiently. For example, if you select (a) Resource as a group, (b) Past Appointments, for (c) a specific account/case, you could quickly determine the appointments that have been previously completed for a patient with a specific resource.
Key Considerations
- Group appointments also appear in each patient's record with the same functionality as individual appointments with the exception of being able to reschedule.
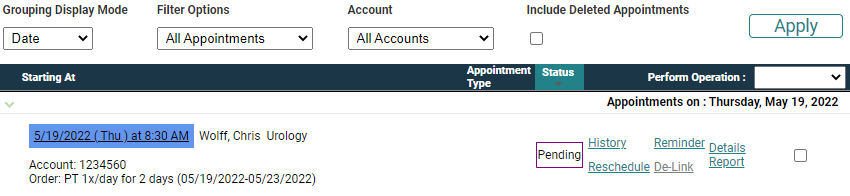
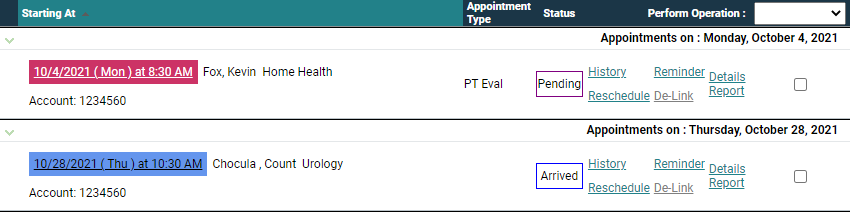
- The Status column in the list of appointments simply displays the currents status of the individual appointments.
Note the designation and the group description set the appointment apart as a group appointment. Also note that Reschedule is disabled. You can manage only the selected patient's status: Go to group demographics to manage other members or their Appointments tab.
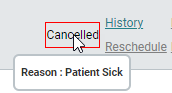
Note that the key line that now borders the status changes color according to the status:
- Purple = Pending
- Blue = Arrived
- Green = Seen
- Red = Canceled/No-show
- The Procedure column simply lists the procedure for which the appointment was scheduled.
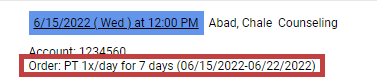
- When your Orders Handling security profile for the domain is set to Full or Read-only and an appointment is linked to an order, an order summary will appear for the appointment and include the following order information: discipline, frequency/interval, order start date-order end date.
Editing Appointments
If you need to edit the details of a specific appointment, click the date-time description under the Starting At column.

This will pull up the Edit Appointment screen so that you can edit the information as if you had accessed it from the grid. Once you have completed your changes, click Continue to return to the Appointments tab. Note, though, that you cannot edit group appointment from individual patient's Appointments screens.
Appointment Operations on the Appointments Tab
Refer to the following links for instructions about using the appointment functions provided here.
