Appointment Colors and Indicators
Color is perhaps the most evident and striking visual indicator to differentiate scheduled time on the grid. When thought and consideration is put into how color is used for appointments, anyone who uses the program will be able to tell at a glance of the grid what types of appointments are scheduled, what time is available, if a hold time is open, etc. The options for configuring the default settings for appointment and status marker color are discussed in the following.
Appointment Color Configuration
To navigate to the system color settings,
- Select Data Maintenance > System and Security > System Settings from the Main menu. The General System Settings screen will appear.
The colors presented are the program’s default colors. Administrators can accept them or change them to meet established workflows of the organization. Even so, some of the system defaults established here can be changed at other levels within the program. Some consideration should be given to everyone who uses the program, including individual personnel and domain requirements, when modifying these.
Appointment ![]() : This option
controls the default color used in several locations throughout the program.
(a) It is the default Case color for new users when they create new cases.
(b) It controls the default color for new procedures. (c) Finally, it
is used as the default appointment color for Group appointments. The default
color is Black.
: This option
controls the default color used in several locations throughout the program.
(a) It is the default Case color for new users when they create new cases.
(b) It controls the default color for new procedures. (c) Finally, it
is used as the default appointment color for Group appointments. The default
color is Black.
Block
Time ![]() :
The default color for block times is gray, but as blocks are created,
users have the option of choosing different colors.
:
The default color for block times is gray, but as blocks are created,
users have the option of choosing different colors.
Hold
Time ![]() : The
default color for hold times is yellow, but as hold times are created,
users have the option of choosing different colors for each individual
hold time.
: The
default color for hold times is yellow, but as hold times are created,
users have the option of choosing different colors for each individual
hold time.
Multiple
Appointments ![]() : One convention
used to distinguish a multiple or double-booked resource appointment is
color. The default is Cyan. Change this to any of the 140 preset colors,
or create a custom color. The multiple color is applied throughout the
organization and cannot be changed by users in the daily scheduling routine.
: One convention
used to distinguish a multiple or double-booked resource appointment is
color. The default is Cyan. Change this to any of the 140 preset colors,
or create a custom color. The multiple color is applied throughout the
organization and cannot be changed by users in the daily scheduling routine.
New
Patient ![]() : New patient color applies
to the first appointment for your patient
in the system (regardless of case). The default color for new patients
is red. Users do not have the option to change this elsewhere.
: New patient color applies
to the first appointment for your patient
in the system (regardless of case). The default color for new patients
is red. Users do not have the option to change this elsewhere.
Not
Here Time ![]() : Not Here
is specific to domain versions of WellSky Resource Manager, and the color can only be
changed on this screen. Use Not Here in shift schedules to indicate
resource unavailability (not here). The default color is
dark blue.
: Not Here
is specific to domain versions of WellSky Resource Manager, and the color can only be
changed on this screen. Use Not Here in shift schedules to indicate
resource unavailability (not here). The default color is
dark blue.
Color Indicators
Two options are used to control whether the New Patient color is displayed and in what circumstances:
- Display Color for New Patient
- New Patient Indicator and Color for New Case
The default new patient color configuration will display the first appointment for every patient in red. This graphical illustration informs all personnel using the program that a patient is in your organization for the first time, which often requires that they need to complete additional routine new patient intake procedures.
In addition to displaying the first appointment in the new patient color, you can also configure the first appointment for each case to display in the new patient color. Organizations that integrate this option will understand when they see an appointment in the associated color that it is either (a) the first time the patient has been seen or (b) that it is the first time they have been seen for a particular incident. In either scenario, the personnel will understand by the color alone that additional intake procedures may be required.
Defining Custom Colors
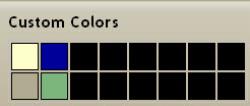
In addition to the 140 preset colors, 16 additional custom colors can be created to meet any requirement you may have. The 16 colors appear in a grid of swatches (placeholders) in Custom Colors panel.

The swatches appear as black until the color has been defined. To define the color,
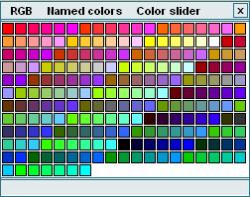
- Click the placeholder you wish to change. A pop-up screen with 3 tabs will appear.
- Use the grid appropriate to your current need to set the new color.
- RGB: This tab presents a color palette of browser safe RGB colors. Simply click the color your desire.
- Named Colors: This tab provides a generic color palette of named colors—these are standard values for commonly named colors. These correspond to the preset colors.
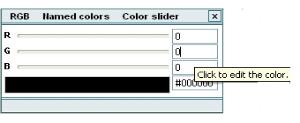
- Color Slider: This tab allows users to define a custom color either by enter their own RGB values or hexadecimal values. Use this to create a color to match default color values used in your organization.
- Click the color field you wish to change. For example, the following screen shot shows the cursor in G (Green) field.
- Enter the value for the color from 0 to 255.
- Repeat steps 1–2 as necessary. Alternatively, tab to the next field and enter the appropriate value.
- Click the color to finish the definition.
- Once you have finished with the System Settings, click Save to commit your changes. Your custom colors will not be available from the color picker until you have saved your new settings.


The new color will appear in the swatch on which you clicked. Note that the color change may be gradual when using the spinner. If you know the RGB color values that you require, then simply click the corresponding fields and enter those values.
